
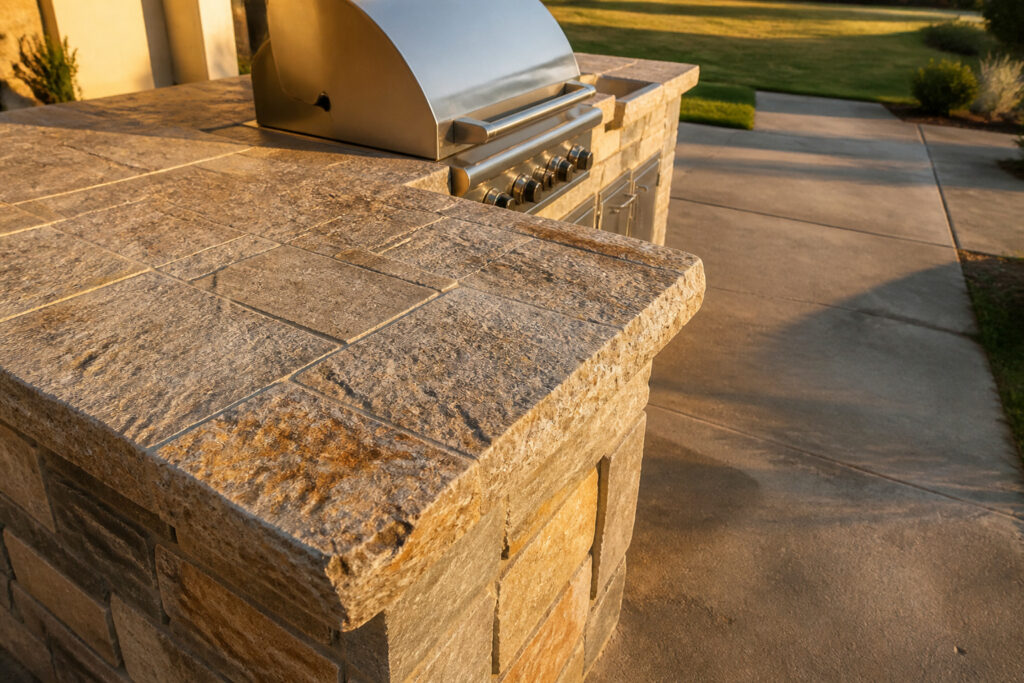

A finished DIY gas grill island runs $2,000–$5,000 for a basic build and demands ten specific stages from design sketch to utility hookup.
Most weekend builders get the framing right and still fail at the same hidden step: the 1-inch air gap between metal studs and the grill shell, without which the surrounding structure cooks itself soft across two seasons.
1. Sketch the Design and Measure Twice
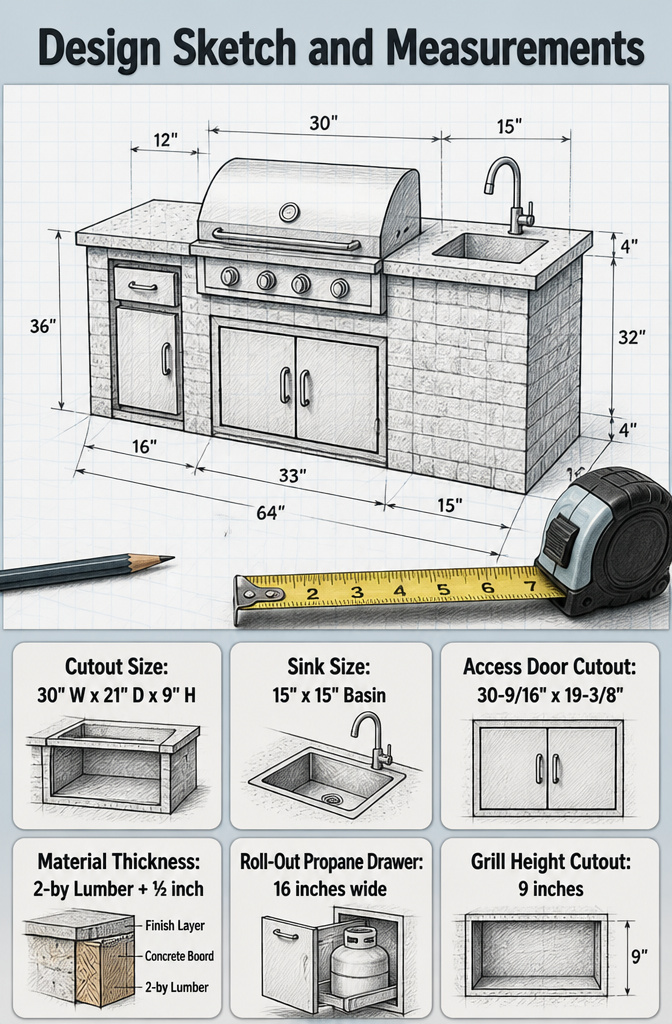
A standard built-in gas grill needs a cutout of 30" W x 21" D x 9" H, which sounds modest until you map it against the full island footprint. That 30-inch width is just the cavity.
The surround, countertop overhang, and side panels add inches in every direction, and the material thickness of your framing and sheathing compounds fast.
Two-by lumber is actually 1½ inches thick, concrete board adds another ½ inch, and your finish layer, whether tile or stucco, tacks on more.
Skip that math and your grill either perches proud of the surface or drops too deep to open the lid without hitting the counter behind it.
I drew my first island on graph paper with each square equal to three inches, then spent an evening with a tape measure pacing the patio. The sink I wanted, a 15" x 15" basin, needed a 14½" x 14½" cutout.
The access door and drawer combo measured 33" x 22" overall with a cutout of 30-9/16" x 19-3/8". Those fractional inches matter when you are stacking components shoulder to shoulder.
The roll-out propane drawer, at 16 inches wide, had to sit where the framing could hide the tank without stealing knee room from the prep counter opposite.
Material thickness also governs appliance placement vertically. A grill rated for a 9-inch height cutout assumes your support shelf sits exactly at the right elevation.
Build that shelf from two-by material and your grill frame rides 1½ inches high. Account for it in the leg heights or live with a lid that catches the breeze wrong.

The entire built in gas grill is made of 304 stainless steel, with a main body thickness of over 2mm. The elaborately polished corners exude an air of high-end quality.

【Professional Grade】Made of 304 stainless steel construction in the body, burners, and grates, ensuring they can resist rust and warping at high temperatures.

#443 Stainless Steel Construction, Assisted Hood, & Cooking Grates for Built-To-Last Natural Gas
2. Frame With Pressure-Treated Lumber

Pressure-treated lumber is the right starting point for an outdoor frame because the chemical treatment actually resists rot and insects, not just surface moisture.
Pressure-treated wood is still combustible, so any framing left exposed near the grill body is a code issue rather than a style choice.
The practical move is building the perimeter walls and countertop support on standard 16-inch centers, then leaving a precise cut-out where the grill head slides in.
I skipped double top plates on my first island and regretted it within a season. The countertop load, especially if you go with concrete or granite, wants to twist a standard single plate over time.
The second ring of lumber across the top of the walls fixes that completely.
For the grill opening specifically, the sources differ in approach. One route builds that entire zone from wood and relies on cement board covering for heat protection.
The other swaps in metal studs for the immediate surround. The metal costs more per piece and needs different fasteners, but it removes the combustion question entirely.
For a weekend build with a few hundred in materials, treated lumber plus cement board sheathing covers the requirement without the specialty run to a second supplier.

3-in-1 Multi-Functional Outdoor Grill Station: This mobile grill cart combines a prep station, BBQ workspace, and storage carbinet unit. It includes two foldable stainless steel side tables, a 360° rotatable folding faucet, a foldable sink, drain pipe, and connecting hose. A dedicated propane tank compartment is also built in. Perfect for outdoor cooking, BBQ, pizza making, or using as a bar table or picnic table, it turns your patio or backyard into a complete outdoor kitchen.

Cooking Power: Featuring four high-efficiency stainless steel burners and a rear ceramic infrared burner, this grill provides 72,000 BTU heat output, ensuring even heating across its spacious 684 sq.in cooking surface. Ideal for hosting large gatherings and family cookouts

Ample Space: The kitchen island incorporates a spacious storage cabinet; Open shelf in the middle for easy access storage of plates, cups or kitchen gadgets; Inner divided shelf allows to store more BBQ accessories
3. Insulate With Fire-Retardant Barrier
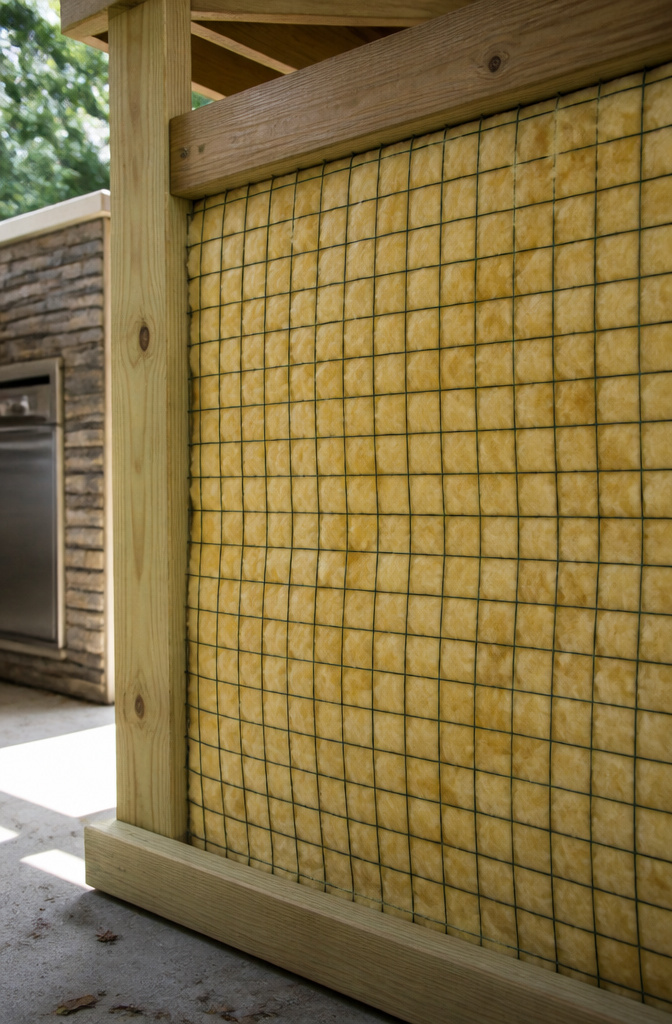
Heat wraps around a grill in ways the frame alone won’t handle. Fire-retardant insulation stuffed behind wire mesh creates the buffer that keeps the surrounding structure from taking on temperature it was never meant to hold.
I learned this after watching a neighbor’s island siding warp across two seasons, the plywood behind it cooked soft enough to dent with a thumb.
The mesh keeps the insulation in place where vibration and wind would otherwise let it sag or bunch, leaving gaps exactly where the heat concentrates.
Without that steady barrier, the concrete board and finish become the only line of defense, and both will eventually crack under repeated cycling from ambient to grilling temperature.
The cost of the insulation and mesh runs modest against the whole build, but skipping it trades a Saturday afternoon of careful fitting for a structure that weakens where you cannot see until something gives.
Long-term safety here means the island survives its own purpose, year after year, without becoming the project you rebuilt once and then quietly stopped using.

【ABOVE 1500HRS SALT SPRAY TEST】FIXLINK wood screws have passed about 1500 hours salt spray test provide exceptional protection against rust and corrosion, specifically designed to work best with either pressure-treated lumber or composite decking. These deck screws for exterior can be exposed to the sun, humidity, rain, and snow conditions for a long time


Package Information: 1000 counts framing nails provide you with a sufficient supply for multiple projects, with a length of approximately 2 inches and a diameter of 0.12 inches, 21 degree ring handle electric galvanized plastic with sheath nails, suitable for a wide range of applications, including construction and woodworking
4. Frame the Grill Opening With Metal Studs

Metal 2×4 studs frame the grill opening in my build, not wood. The manufacturer instructions for most built-in units warn against placing combustible framing directly against the appliance, and even pressure-treated lumber is still combustible.
Heat radiates through the cutout for hours after the burgers are done, and that steady exposure warps wood and degrades the treatment over a season or two.
I integrated the metal by cutting it 3½ inches wide to match the wood studs in the rest of the island, then tied the two frames together with short lengths of track screwed top and bottom.
The joint sits outside the grill manufacturer’s required clearances, so the transition from metal to wood happens where temperatures stay reasonable.
Leave a 1-inch air gap between the metal and the grill shell unless your specific unit ships with an insulated jacket that allows tighter spacing.
The metal costs more per foot and needs tin snips or a metal-cutting blade, but in this zone it removes the worry. Everywhere else, standard lumber still makes sense.

Outdoor Kitchen Grill Set: Experience the joy of outdoor cooking with this modern, stainless steel outdoor kitchen grill set. Perfect for entertaining, this bundle is a BBQ Kitchen Island Starter set with a built-in grill.

Precision Opening: Overall dimensions: 762x533x46 mm / 30x21x2 inches, installation size: 27x18inch/677x448mm, it is recommended to reserve an additional 0.08inch/2mm on this basis for better operation. The door is designed specifically for outdoor kitchens and barbecue islands. With precise dimensions, it is easy to process, install, or dismantle. Available in various sizes and styles, it is perfect for indoor/outdoor kitchens and all other outdoor weather conditions.

Outdoor Kitchen Grill Set: Experience the joy of outdoor cooking with this modern, stainless steel outdoor kitchen grill set. Perfect for entertaining, this bundle is a BBQ Kitchen Island Starter set with a built-in grill.
5. Sheathe in Concrete Board

Concrete board is the skin that turns a lumber frame into something a grill can actually sit against without becoming a fire statistic.
I use it on every outdoor kitchen I build, and the difference from plywood or backer board is immediate: the stuff shrugs off direct flame, rain cycles, and the general abuse of a backyard that sees real use.
Fasten it with screws every 6–8 inches, not nails. Nails back out; screws stay put through expansion and contraction.
Hit every stud, and don’t trust adhesive alone behind a heat source. For seams, mesh tape and thinset mortar are the standard, same as a shower wall.
Skip the tape and you’ll see hairline cracks inside a season, especially if your island gets afternoon sun on one face and shade on another. The mud bed doesn’t need to be pretty here; it’s a substrate, not a finish.
Keep it flat, let it cure, and move on to the next layer.

DURABLE AND FLEXIBLE - 1/2inch(width) x 10feet(length) flexible quarter round molding trim, made of high quality PVC material.

Complete Kit, 2 Forms + 100 Zip Ties: each flexible plastic concrete form measures 4 x 78.7 inches. The ties lock overlapping ends and bind strips to wooden stakes in seconds, so you skip nails, screws, the drill and a second trip to the hardware store.
BONDS THE HEAVIEST MATERIALS: Liquid Nails LN-901 heavy duty adhesive bonds plywood, wafer board, foam board, treated lumber, tile board, cabinets, brick veneer, drywall and countertops.
6. Add Ventilation for the Grill
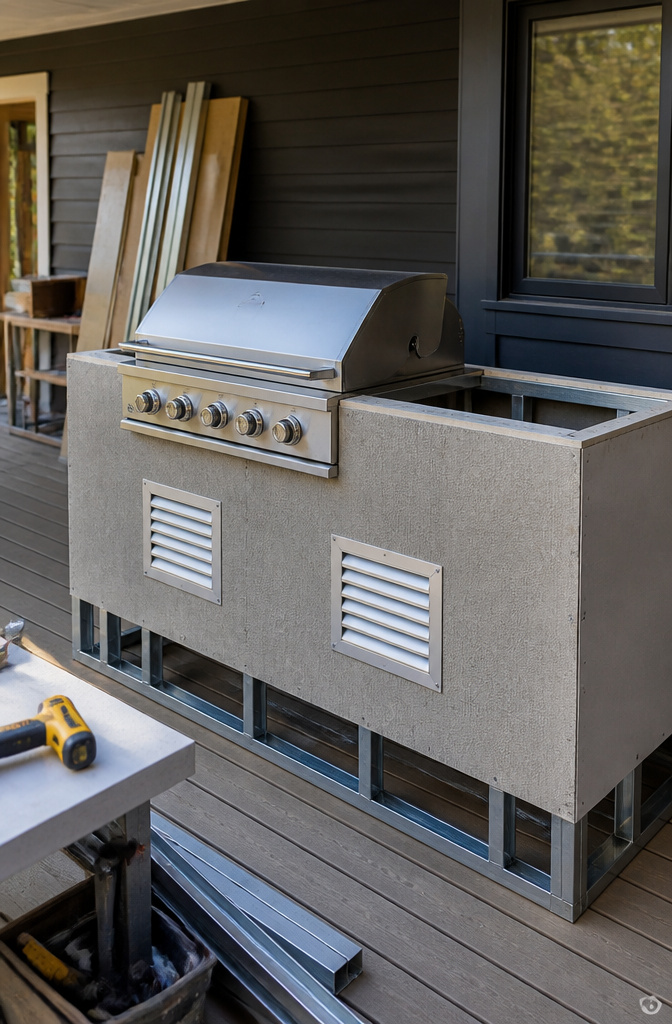
A built-in grill needs ventilation below the unit as well as above it, especially with LP gas, since propane is heavier than air and will settle in the lowest part of the island if it leaks.
Natural gas rises, but both fuels need airflow to keep heat from building up inside the cavity and stressing the connections.
Wood framing makes this non-negotiable. Combustible framing has to stay separated from the grill according to the manufacturer’s clearances, and that includes the vent openings themselves.
Do not butt the grill box directly against pressure-treated studs without checking whether your specific model requires an insulated jacket and exactly how much air gap it calls for.
Placement follows the fuel type. With LP, vents low on opposite walls let any pooling vapor escape before it reaches ignition height.
With natural gas, low vents still help the burner breathe and keep the cabinet from turning into an oven.
The grill manual will list minimum square inches of opening; if it does not, the general rule is to match the area of the exhaust opening at the rear and add a second path at the base.
I cut mine into the concrete board sheathing before the finish went on, using simple louvered aluminum covers meant for foundation vents.
They cost a few dollars, they do not clog with stucco texture, and they are easy to swap if a hose ever weeps in the night.

【Even and Efficient Cooking System】 The built in grill has 5 stainless steel tube burners to produce even heat; the efficient bbq grill help reduce your cooking time and provides steakhouse quality searing.

【Even and Efficient Cooking System】 The built in grill has 3 stainless steel tube burners to produce even heat; the efficient bbq grill help reduce your cooking time and provides steakhouse quality searing.

It can be linked to a natural gas line, giving you a convenient, cheaper supply of fuel in constant supply.
7. Set the Countertop
Concrete sends cold straight into your hands and traps grease in every pore you do not seal.
For a grill island, the countertop needs to wipe clean after a Saturday burger night and shrug off a spark from the chimney starter.
Tile on concrete board works and costs little, but the grout lines stain almost immediately with rendered fat.
Solid surface remnants from a kitchen remodel look sleek in year one; the UV turns them chalky by year three and the span sags if the framing underneath hits four feet without a brace.
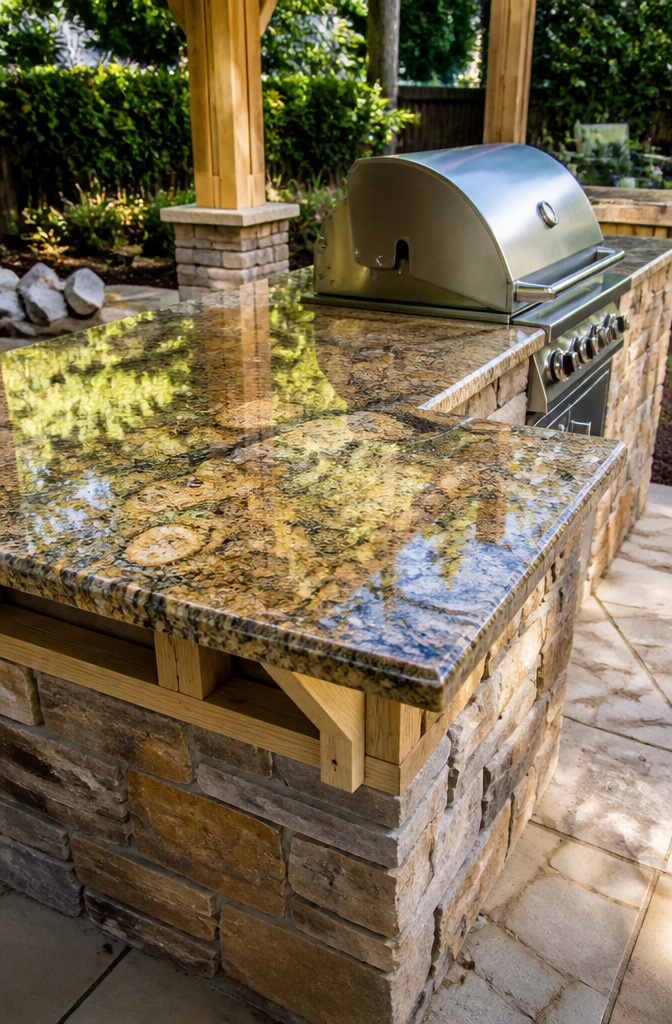
Granite scraps from a local stone yard solve both problems, though the weight demands an extra cross-member mid-span.
I skip anything that needs resealing twice a season because I will not do it, and the countertop fails the moment maintenance becomes a wish instead of a habit.
Most yard quotes for a 2 x 4 foot piece run between what you paid for the grill itself and double that; bring your frame dimensions and ask them to cut the sink or grill drop-in while their saw is running.
If the bottom of the stone sits more than a foot above the enclosure, bolt a shelf of angle iron inside the frame before the top goes on.
The stone does not flex, but your lumber does, and a dropped six-pack will tell you where the weak point was.

Premium Stainless Steel Tabletop: Made of high-quality stainless steel tabletop, this outdoor grill cart features a stable, non-wobbling structure supporting up to 88.2 lbs / 40 kg, while the surface is easy to clean and rust-proof

FITS TOP OUTDOOR KITCHEN BRANDS: Custom-engineered to deliver a precise fit for extra-large 56-inch wide built-in barbecue grill heads. This oversized protective guard is compatible with Kalamazoo Hybrid, Fire Magic Echelon 54" series, and custom oversized backyard setups. Always confirm your grill head's overall width and depth dimensions match this cover's profile before purchasing to ensure a perfect, tailored fit.

4-Burner 72000 BTU Grilling Power: 4 tubular stainless steel high-efficiency burners + rear ceramic infrared burner + side burner deliver 72000 BTU total heat for searing, smoking, and feeding a crowd. 8mm stainless steel cooking grids and 38"x18" (684 sq.in.) cooking area ensure ample space for burgers, steaks, veggies, and more
8. Apply the Finish

Brick veneer, stone veneer, stucco, and tile are the finishes that actually survive on a grill island, and the choice between them depends on whether your winter includes freeze-thaw cycles.
Stucco and tile crack when water gets behind them and expands; in the Northeast and Midwest, that means stone or brick veneer with a proper drainage gap is the safer bet.
The Southwest gets away with more options because arid air keeps moisture out of the wall assembly entirely.
Matching the house exterior sounds obvious, but the cement board underneath needs to be rated for exterior use and the fasteners need to be stainless or galvanized.
Rust behind the finish is what kills these islands, not the surface you see. A prefab frame wrapped in cement board saves the structural work, but the finish application still takes real skill to get right.
If you have never set tile or floated stucco on a vertical surface, practice on a small panel first.
The square, level frame from the manufacturer helps, but it does not fix a wavy tile job or a cracked mud coat.

Sufficient Supply with Proper Size: this package of 1000 framing nails ensures a sufficient supply for various projects; Each nail measures about 3-1/2" long and 0.131" in diameter, ideal to meet a wide range of application requirements in construction and woodworking; The 21 degree ring shank hot dipped galvanized plastic strip sheathing nails are nice for use; With consistent dimensions in each set, these framing nails offer consistent performance and reliability

Package Information: 1000 counts framing nails provide you with a sufficient supply for multiple projects, with a length of approximately 2 inches and a diameter of 0.131 inches, 21 degree ring handle electric galvanized plastic with sheath nails, suitable for a wide range of applications, including construction and woodworking
Sufficient Supply with Proper Size: this package of 1000 framing nails ensures a sufficient supply for various projects; Each nail measures about 3" long and 0.120" in diameter, ideal to meet a wide range of application requirements in construction and woodworking; The 21 degree ring shank hot dipped galvanized plastic strip sheathing nails are nice for use with your 21 degree framing nailer; With consistent dimensions in each set, these framing nails offer consistent performance and reliability
9. Connect Gas, Water, and Electric
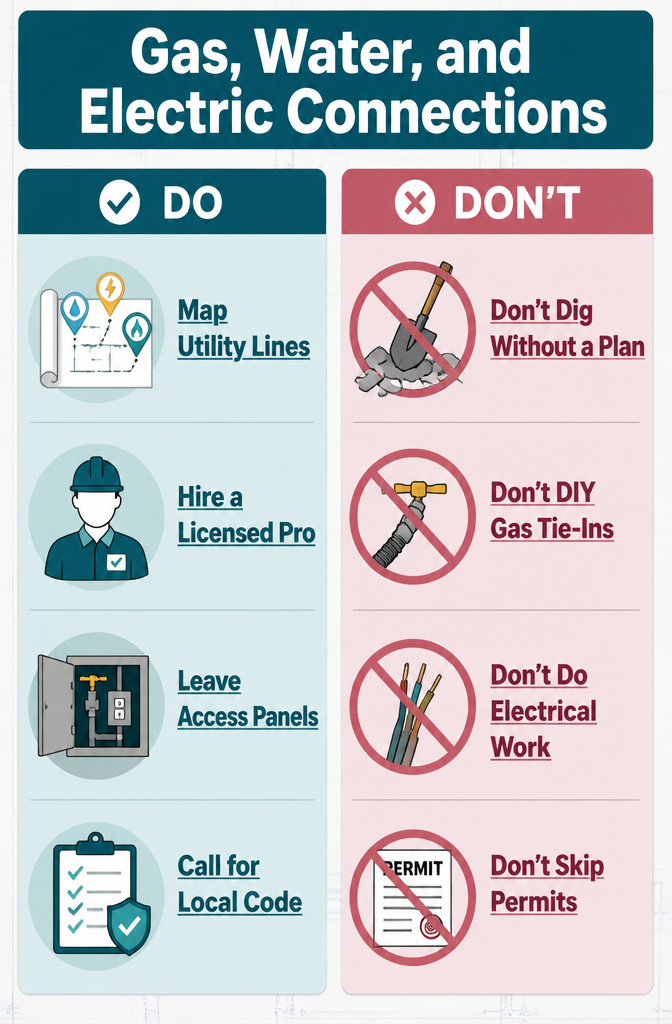
Utility lines should get mapped before you pick a single appliance.
Natural gas grills need a gas line stubbed out to the island’s footprint, sinks need both pressurized supply and a drain route, and any refrigerator, ice maker, or overhead lighting needs an outdoor-rated outlet or junction.
I drew my layout twice: once with everything I wanted, then again after walking the patio with a plumber and an electrician to mark what the existing slab could actually reach without tearing up half the yard.
Hire a licensed pro for gas and electrical tie-ins. Local code almost always requires it, and permits pulled by a homeowner on those trades get rejected in most jurisdictions I checked.
What you can handle yourself is the planning: measuring final appliance locations so the pro knows exactly where to stub lines, leaving access panels in the framing for shut-off valves and junction boxes, and sequencing the work so concrete board and countertops don’t block later inspection.
Propane drops some of this complexity if natural gas isn’t an option, though you’ll still want an electrician for any outdoor receptacles.

Precision Opening: Overall dimensions: 711x482x45 mm / 28x19x2 inches, installation size: 25x16inch/626x397mm, it is recommended to reserve an additional 0.08inch/2mm on this basis for better operation. The door is designed specifically for outdoor kitchens and barbecue islands. With precise dimensions, it is easy to process, install, or dismantle. Available in various sizes and styles, it is perfect for indoor/outdoor kitchens and all other outdoor weather conditions.

Large Storage Space: Overall Size: 16"W x 24.4"H x 16"D. Cutout Size: 14"W x 22.4"H x 16.4"D. Our trash drawer is simple to assemble and provides spacious storage space for you to hold a lot of kitchen trash at one time. You will have a clean and neat kitchen.

High-Quality Material & Integrated Frame: Crafted from premium stainless steel with a seamless one-piece frame construction, our outdoor kitchen doors deliver outstanding durability, enhanced strength, and an elegant look. Resistant to rust and corrosion, they are perfect for long-term outdoor use in all weather conditions
10. Add Lighting and Seating

Task lighting over a grill island is one place where catalogs and reality split wide open. Those magazine spreads show polished sconces throwing a perfect cone of light onto a steak.
What they do not show is a cook standing mid-flip, blocking that cone entirely and casting a shadow over the grates.
After installing and moving two different fixtures on my own build, I settled on a low-voltage LED strip tucked beneath the counter overhang, running the full depth of the cook surface.
It lights the food from the front, so the body does not eclipse the beam, and the 12-volt draw means no conduit to bury or electrician to hire in most jurisdictions.
Ambient lighting is where I spent money I should not have. String bulbs across the pergola looked romantic in the planning stage and turned my patio into a parking lot of glare once the sun went down.
Reflections off the countertop made the space feel clinical, not inviting. Low-voltage bollard lights at ground level, aimed into planting beds, give the glow without the bulbs in your face.
The same transformers run both strips and bollards, so the wiring stays simple.
Seating built into the island itself saved space but cost comfort. A fixed bench at counter height sounds efficient until a tall guest folds at the knees or a short one perches like a bird.
I swapped mine for freestanding stools with backs. The stools tuck under when the grill is the focus, and they move to face the fire pit when the evening shifts.

100% PURE: Dark Tung Oil for wood finishing; Dark Tung Oil provides a dark matte, and waterproof protective finish; Achieve an aged look on a variety of wooden surfaces

Dimensions for the Orange Foam Board: Depth 10.25" or 12" or 14"; Length options: 24", 36", 46", 60", 72" or 84"; Total Width: 4" The Original Shower Bench Bracket Quantity varies based on the chosen length, supporting up to 640 pounds 24" & 36" Includes 2 brackets; 46" Includes 3 Brackets; 60" Includes 4 Brackets; 72" Includes 5 Brackets; 84" Includes 6 Brackets NOTE: Brackets will be an aluminum color

100% PURE: Pure Tung Oil for wood finishing; Tung Oil provides a natural, matte, and waterproof protective finish for a variety of wooden surfaces
Materials That Survive Outside

The grill head you drop in had better be 304 stainless steel, or you will watch it pit inside two seasons.
A magnet will tell you the difference if a seller’s label does not: 304 is not magnetic, while the cheaper 400-series grade is.
- Pressure-treated wood for the frame is what most guides list first, and it is where I would spend, not save. The $40 difference between standard and ground-contact rated lumber disappears fast when the frame starts warping the tile above it.
- Metal framing skips the rot and termite risk entirely, though you trade the forgiving give of screws in wood for a drill and self-tappers that strip if you hurry.
- Cement board is the non-negotiable layer between the frame and anything flammable: the grill opening, the side burner gap, the back panel if you are close to siding.
- Stucco, tile, or stone veneer for the finish all share one weakness the Southwest can ignore and the rest of the country cannot. Moisture that gets in past a hairline crack will freeze, expand, and rust the frame inside. Applied finishes on cement board need a weather-resistant barrier behind them, not just the board itself.
- A grill cover is not optional backup but part of the material system. It is the cheapest way to cut the rain that finds those cracks.
What Permits to Pull
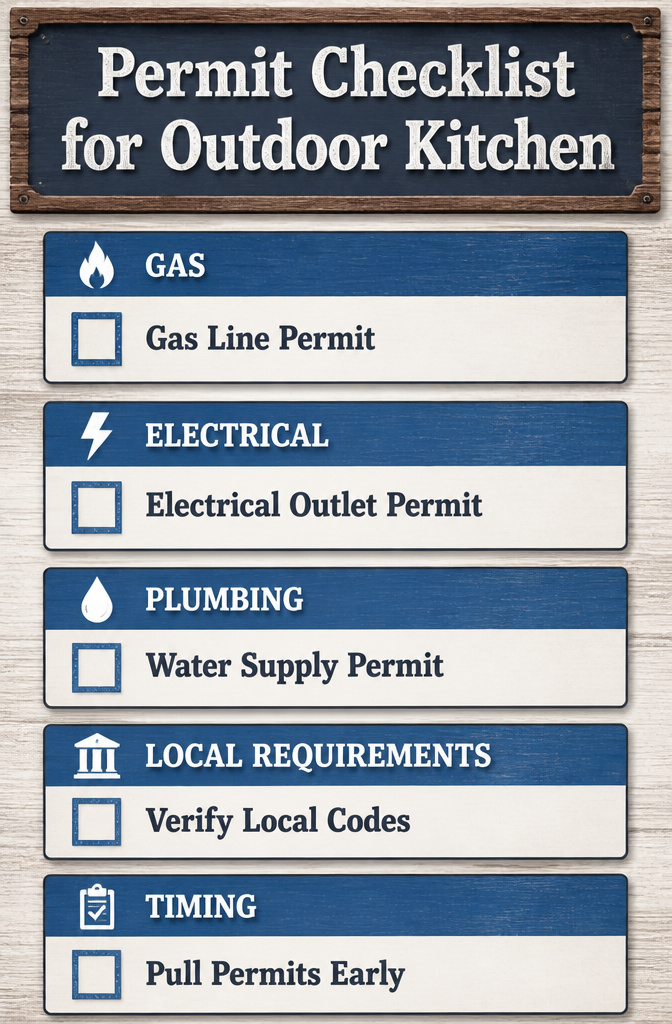
Gas lines, electrical outlets, and water supply for a sink each trigger their own permit category, and local code decides whether weekend work crosses the line into licensed-trade territory.
In most jurisdictions, homeowners can pull permits for basic framing and finishing, but gas lines almost always require a licensed pro on the paperwork.
Electrical for outdoor-rated outlets sits in a gray zone: some areas allow owner-installation with inspection, others demand an electrician’s stamp.
The way to know is to call your city or county building department with your appliance list in hand.
Ask specifically about outdoor kitchen grill islands as permanent fixtures, because some departments treat them like sheds and others like house additions.
Skipping this step means a failed home inspection later, or worse, an insurance denial if an uncapped line or ungrounded outlet causes damage.
Pull permits before the concrete pad goes in, because inspectors want to see underground work before it gets buried.
Budget Ranges for Real Builds

A $2,000–$5,000 DIY grill island gets you a basic station with the grill head and limited counter space; that’s the entry point for anyone working weekends with their own hands.
Push to the mid-range at $5,000–$15,000 and you add storage, prep space, and basic appliances. Premium builds run $15,000–$30,000-plus for large layouts, refrigeration, sinks, side burners, and finished surfaces that look built by a crew.
The gap between what sources call "simple" and what weekend builders actually attempt matters here.
At a few hundred to a thousand dollars, you’re not building a fixed island; you’re maybe refurbishing a cart, adding a side table, or laying pavers for a grill pad.
The numbers above assume you are buying the grill itself, which eats most budgets first.
| Build type | Cost range | What it buys | Weekend realistic? |
|---|---|---|---|
| Basic DIY grill island | $2,000–$5,000 | Grill, small counter, minimal storage | Possible if skilled |
| Mid-range outdoor kitchen | $5,000–$15,000 | Grill, counters, storage, basic appliances | Stretched across several weekends |
| Premium outdoor kitchen | $15,000–$30,000+ | Large layout, refrigeration, sink, premium finishes | No; this is weeks or hired labor |
| RTA outdoor kitchen kit | $2,000–$10,000+ | Pre-designed components, faster assembly | Most realistic for limited time |
Pre-designed RTA kits sit in an interesting middle space: faster to assemble but still requiring the same utility connections.
Where I’d put money first is the grill itself, then the structure that keeps it level and dry; everything else can follow in later seasons.
Modular Kits Versus Full Custom
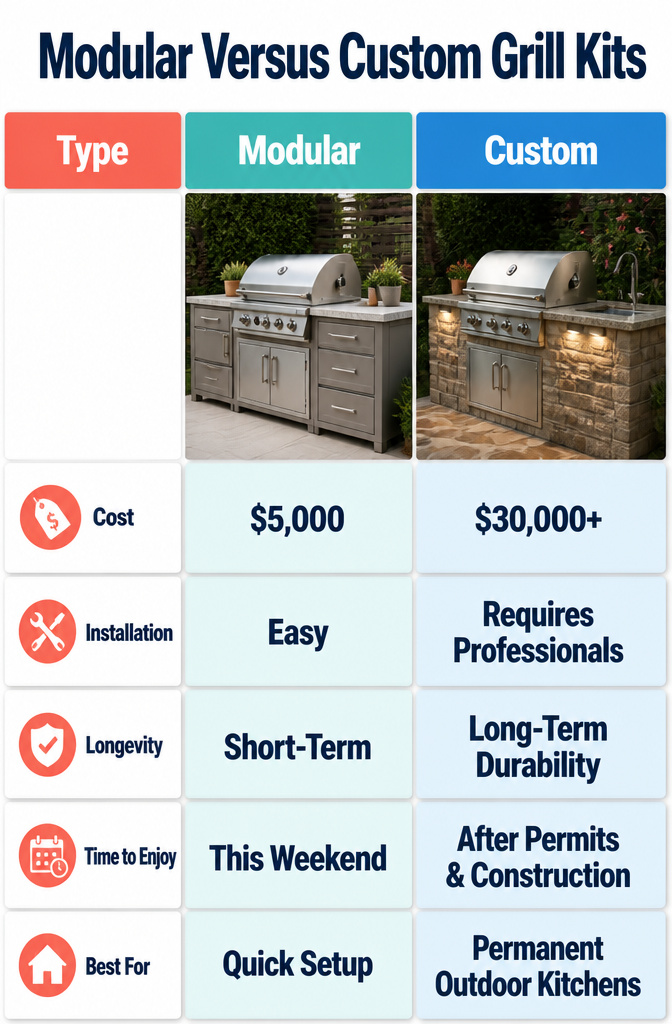
A modular grill station runs about five thousand dollars on the low end and lets you stack cabinets like Lego until the layout works.
Some kits ship fully assembled, and every part is already compatible, which means you are grilling the same weekend instead of calling in a plumber to check your gas line routing.
The downside hits three years out, when the cabinet faces start peeling and the hardware rusts hard.
Custom framing with metal studs or concrete block can easily climb toward thirty thousand once you add appliances, utilities, and finishes.
You also pull permits for gas and electrical, and you are doing the math on burn clearances and ventilation yourself. For a first-home owner with a rented miter saw and two Saturdays, that math eats the whole project.
Renters should skip both and look at nothing permanently plumbed, since proper winterization and drainage are not happening on a place you do not own.
If you already own and you are deciding where to park the budget, the real choice is whether you need that island to outlast your mortgage. Modularity trades longevity for speed; full custom trades your summer for permanence.
Frequently Asked Questions
How much does it cost to build a DIY gas grill island?
A realistic DIY gas grill island runs from $2,000 to $5,000 for a basic build with the grill head and limited counter space.
Mid-range projects with storage, prep space, and basic appliances land between $5,000 and $15,000, while premium layouts with refrigeration, sinks, and high-end finishes climb past $30,000. The grill itself eats the first slice of any budget.
Do I need permits to build an outdoor kitchen grill island?
Yes, and you should pull them before the concrete pad goes in.
Gas lines almost always require a licensed pro on the paperwork, electrical for outdoor outlets sits in a gray zone by jurisdiction, and homeowners can usually handle framing and finishing permits themselves.
Call your city or county building department with your appliance list and ask specifically about outdoor kitchen grill islands as permanent fixtures; some departments treat them like sheds, others like house additions.
What is the best material for a barbecue island?
Pressure-treated lumber for the frame, cement board for the sheathing, and 304 stainless steel for the grill head.
Metal studs beat wood inside the grill opening because they remove the combustion question entirely, and your finish layer should be stone or brick veneer if your winter includes freeze-thaw cycles.
A grill cover is not optional backup but part of the material system; it is the cheapest way to cut the rain that finds cracks.
Does a grill island add value to my home?
A properly permitted, well-built island that survives its own purpose year after year is more likely to be an asset than a liability when it comes time to sell.