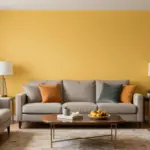

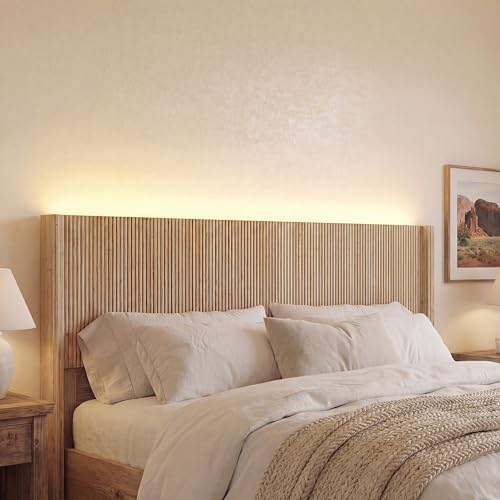
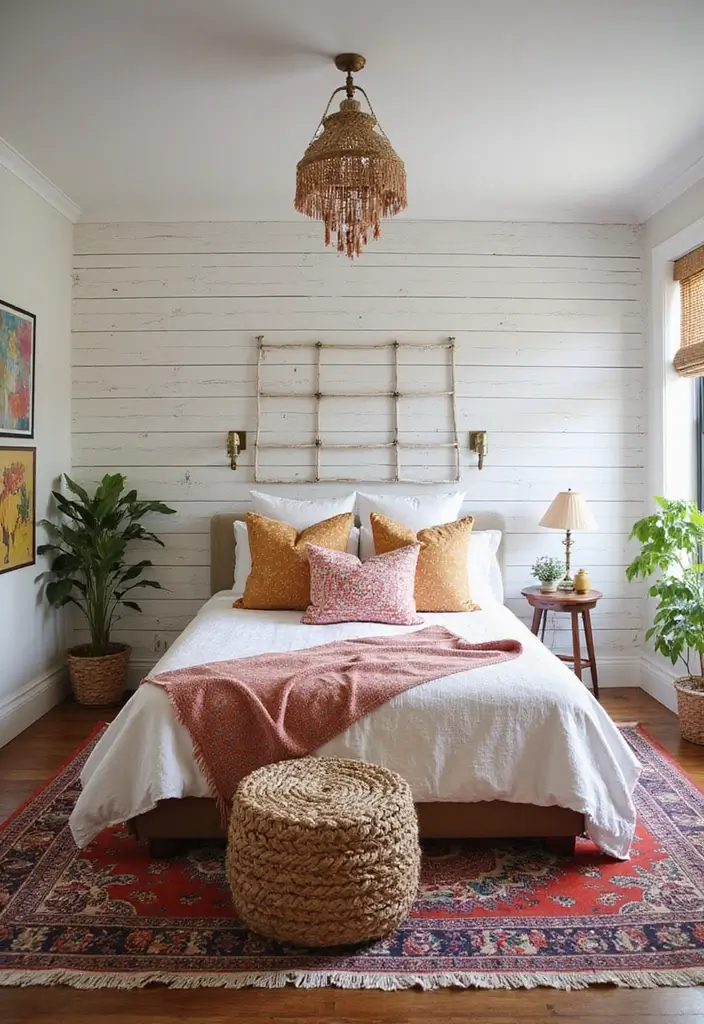
Here is why I put this together. A bold headboard wall can lift a dull bedroom in minutes without a big remodel. It changes the mood, adds texture, and guides the eye to the bed. I gathered 30 bedroom headboard ideas that make a bold statement. If you want impact without heavy work, this list is for you.
If you love a cozy, stylish, or bold room, this one is for you. If you rent or shop on a budget, these ideas help you refresh a space without drilling new holes. You can mix and match materials like fabric, wood panels, metal accents, or peel and stick wallpaper to fit your vibe.
Here you will find 30 ideas that span many looks. From upholstered panels to mirrored accents to natural wood moments, there is something for every bedroom. Each idea comes with practical tips on choosing height, color, texture, and the best mounting method.
Here is how to use it. Start with the feel you want in your room and your ceiling height. Think about scale: a large panel makes a bold statement in a big room, while a smaller setup works in a compact space. Pair your choice with lighting and bedding to seal the look.
These ideas reflect current trends like plush fabrics, warm wood, and clean metal. The best part is that they stay doable with low-cost or easy installs. You can get a strong look with a curtain rod, a slat wall, or a panel covered in wallpaper.
Next steps: scan the ideas, pick your top three, and map out your install. I show practical steps and quick tools you need. By the end, you can pull off a bold headboard wall this weekend.
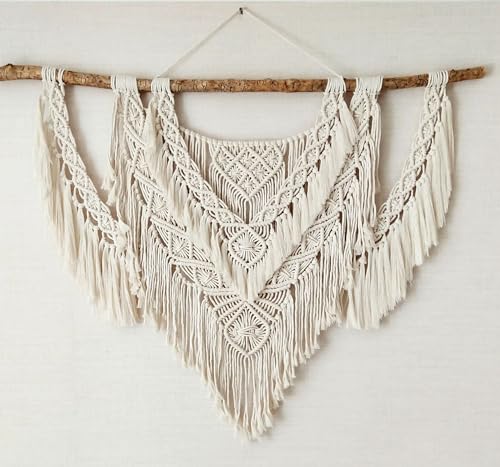
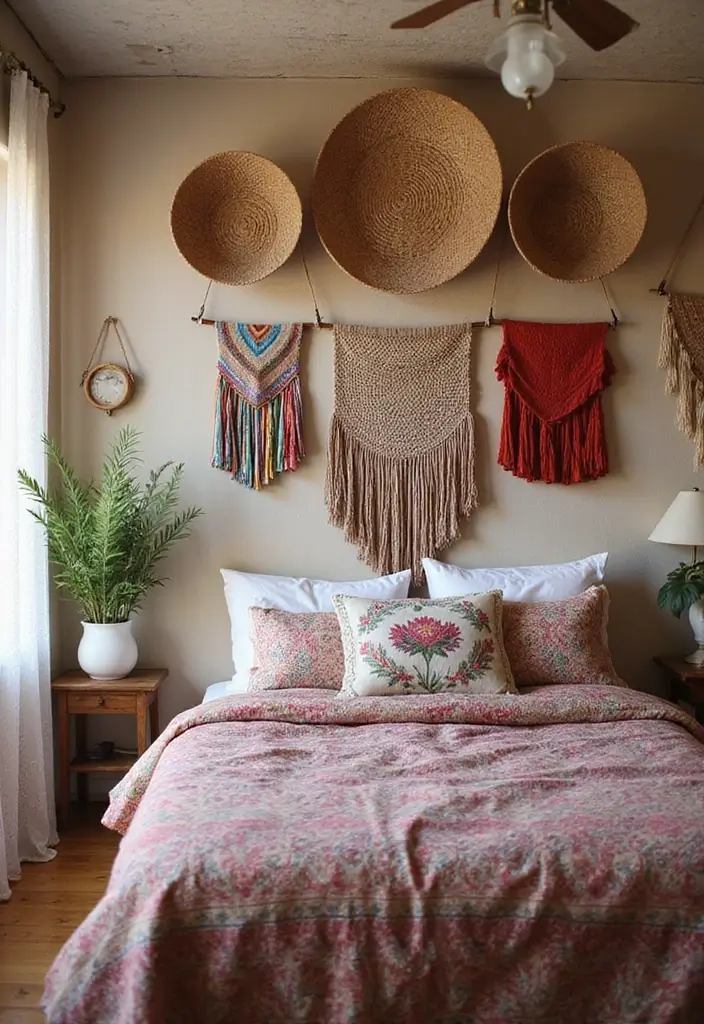
1. Macrame Magic
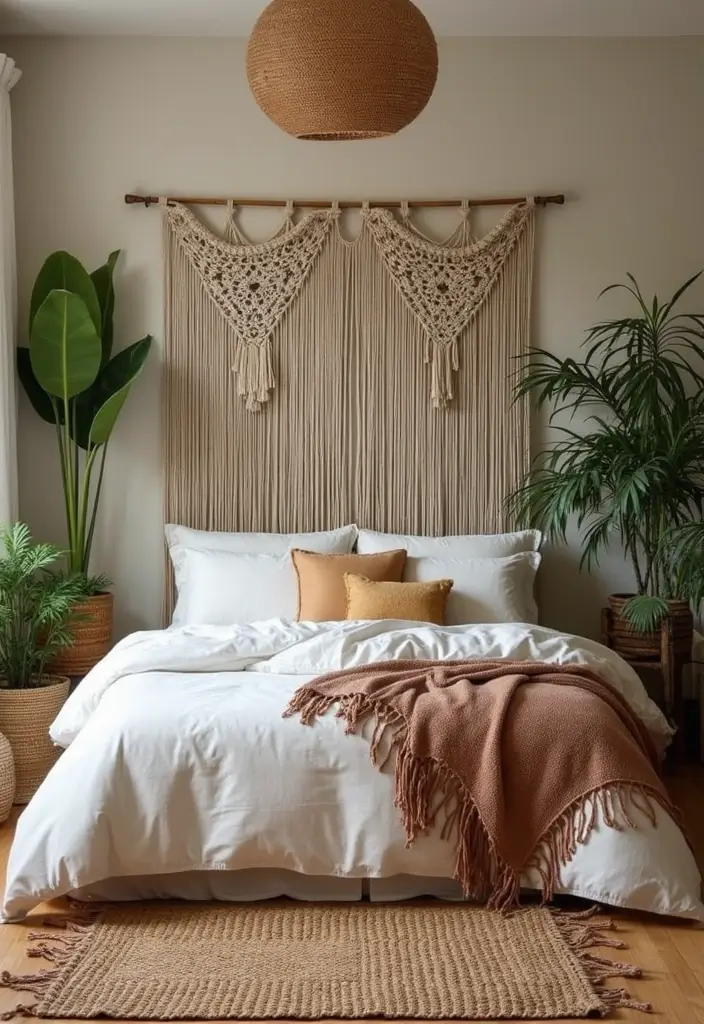
Want a bedroom that feels warm and stylish without a big remodel? Here is why macrame headboards work. Macrame headboards offer a quick, affordable upgrade. They add texture and a soft boho vibe. The knots form gentle patterns that catch light and keep the room inviting.
Hang a large macrame piece directly above your bed to anchor the room. Or mix in several smaller wall hangings to create a layered, gallery-like look.
Choose natural fibers in muted tones for a calm, soft mood. If you want a pop of color, pick brighter hues like rich red, deep blue, or emerald green to wake the space. Pair the fibers with earthy textiles and a few plants to finish the scene.
This setup is easy to adjust when you want a quick room refresh.
– Tip: Choose a wall color that complements the macrame. Neutral shades work well.
– Trick: Layer different macrame pieces for depth and texture.
– Unique Insight: Handmade macrame brings a personal touch to your space.


2. Bold Wallpaper Backdrops
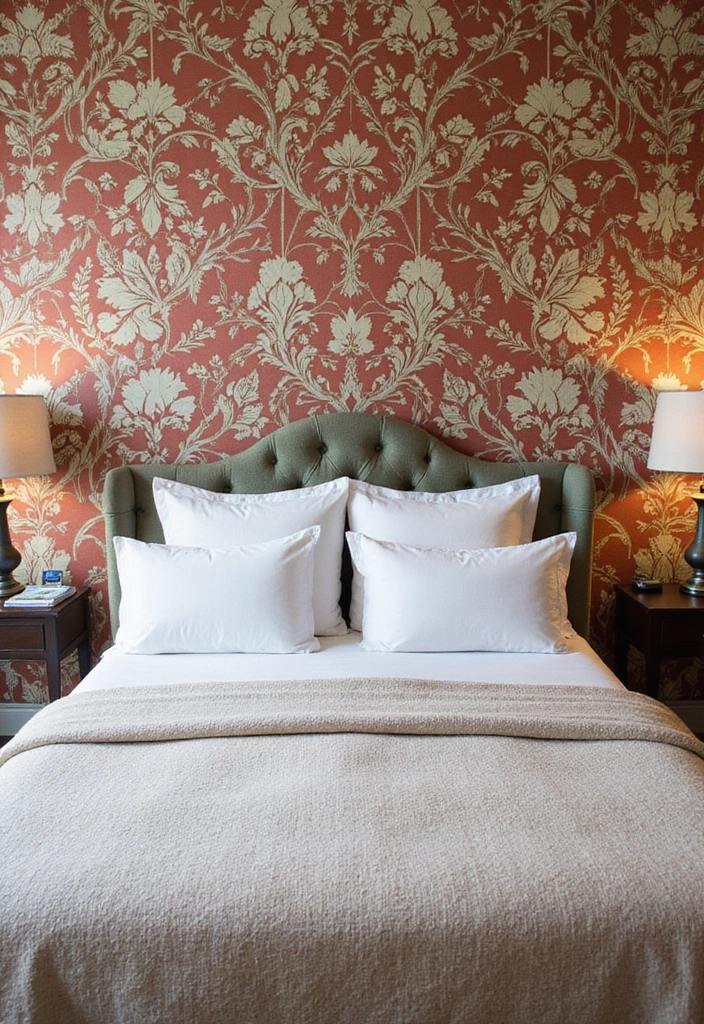
You want a headboard wall that grabs attention without making the room feel busy. A wallpaper backdrop can do that. It acts like art behind the bed and adds depth you can feel in the morning light.
Here is how to make it work.
– Pattern and color:
– Choose a large floral or geometric print on the wall behind the headboard to make the area pop.
– If your space is small, pick a smaller repeat or a subtle texture to keep it calm.
– Tie the wallpaper to your bed linens with similar or complementary colors.
– Material and finish:
– Peel-and-stick wallpaper is easy to remove when you want a refresh.
– Non-woven papers feel sturdy and lay flat.
– A textured option like a soft grasscloth adds warmth.
– Placement tricks:
– Cover only the wall behind the bed for a focused feature.
– For drama, run the wallpaper up to the ceiling on that wall.
– Maintenance:
– Removable options save time and mess during updates.
– Complete the look:
– Add a few throw pillows and a throw blanket that pick up the wallpaper colors.
– Good lighting helps the pattern shine, from bedside lamps to soft overhead light.
Next steps: pick a sample, test under light, and measure the wall before you buy.
Your room will feel warmer and more personal.
3. Wooden Pallet Headboard
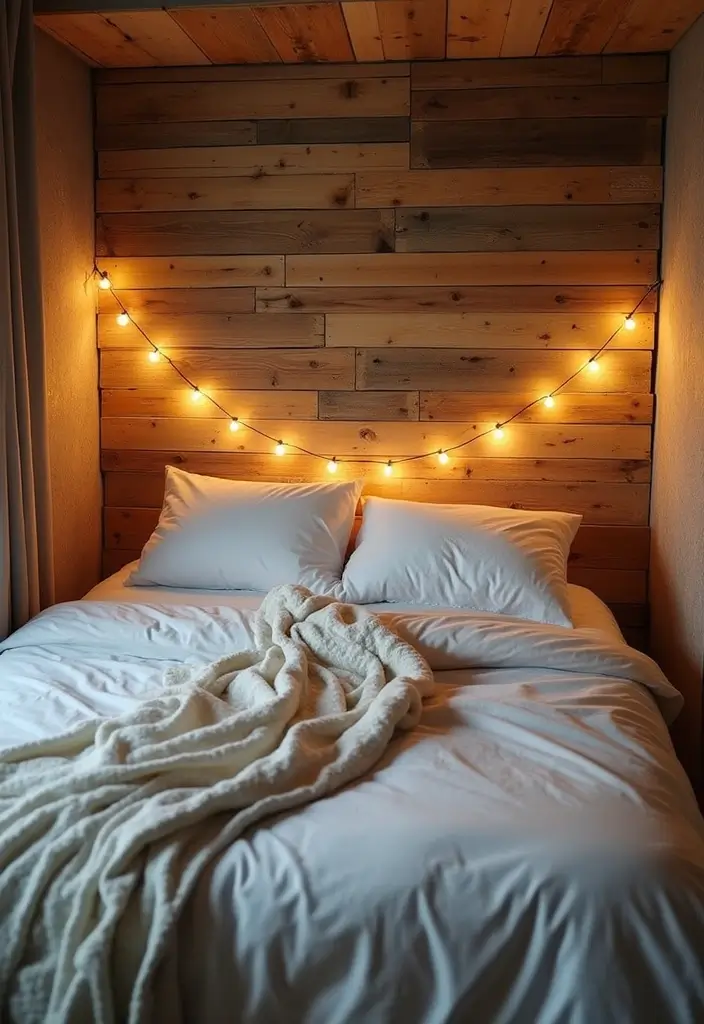
You want a bold headboard without a big price tag. A wooden pallet can give you that look. It adds warmth and a rustic feel to your room.
Layout options are simple. Stack pallets vertically for a tall backdrop, or place them side by side for a wide plank style. Secure the boards to a sturdy frame or to the wall with screws.
Finish choices fit your style. Light stains or whitewash keep the room bright and boho. Dark stains add depth and drama. Paints are fine too if you want a pop of color.
Safety first. Pick heat treated pallets to avoid chemicals. Check for nails and loose boards before you start.
– DIY Tip: Sand the boards well to remove splinters.
– Tricks: Add fairy lights along the top edge or behind the planks for a soft glow.
– Unique Insight: Rough wood against soft fabrics like linen and velvet makes the boho vibe feel alive.
Two simple layouts work best. Vertical stacks feel bold. Horizontal planks feel calm. Mount to wall studs or a solid frame.
Next steps
– Measure your bed and choose headboard height.
– Inspect pallets for nails and warps; pick smooth boards.
– Sand again after assembly, seal lightly, and mount.
You can finish this project this weekend.
Transform your bedroom with a wooden pallet headboard – the ultimate blend of style and savings. Create a cozy, bohemian vibe without breaking the bank!


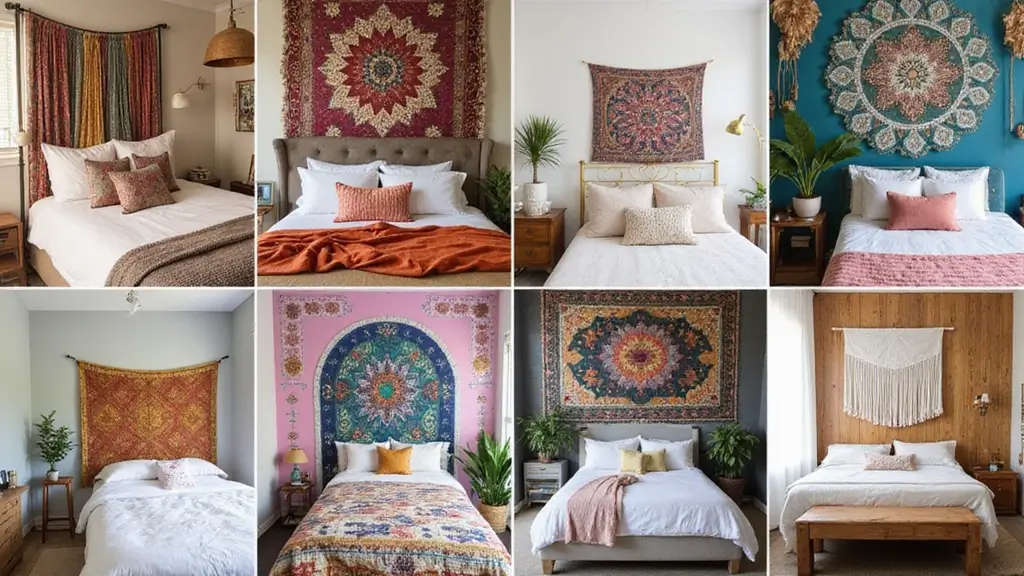
4. Colorful Tapestry Displays
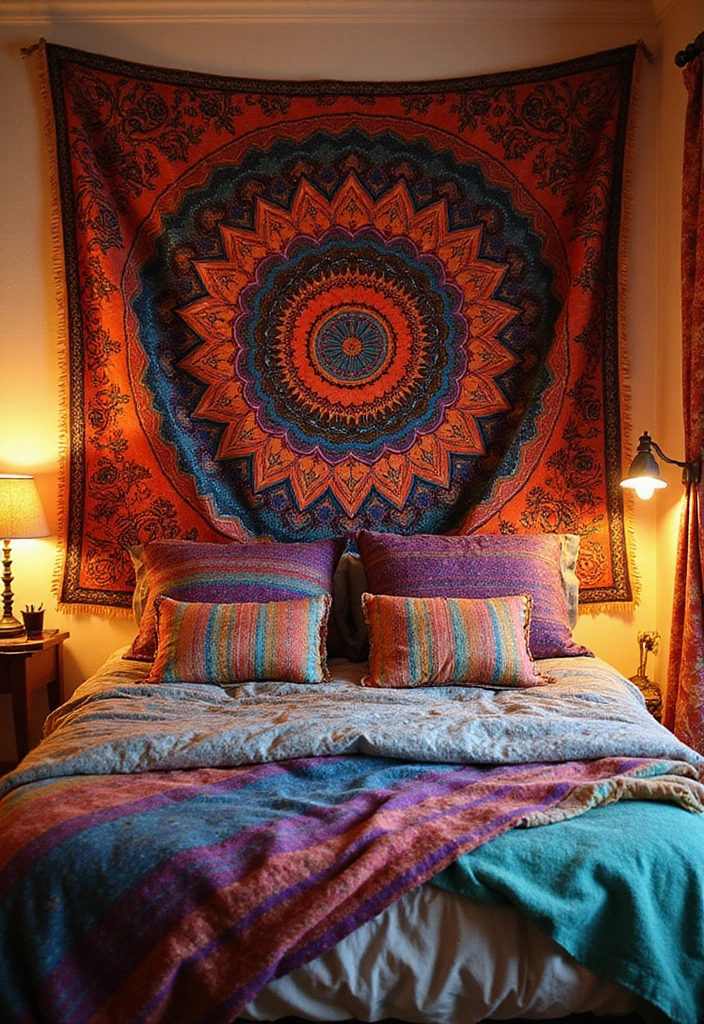
If you want a bold headboard look that won’t break the bank, try a colorful tapestry. It adds color, texture, and depth to your bedroom. A large textile can instantly set the mood and make plain walls feel warm.
Here is how to use it well.
– Choose a design you love Pick mandalas, nature scenes, or abstract art that fits your style. A bright pattern guides the room’s color.
– Decide on size and placement Hang it high above the bed for drama, or let it cascade down for a casual, cozy feel.
– Install with simple tools Use a tension rod, removable hooks, or a slim rod. It’s easy to swap when you want a seasonal refresh.
– Build a gallery wall with smaller pieces Mix several smaller pieces in a neat layout. You get a lively focal point.
– Choose good materials and care Cotton and wool blends feel soft for you. Polyester prints stay bright. Clean with a gentle wash or spot clean.
– Enjoy the mood shift The fabric softens sound and adds a calmer vibe to your space.
Next steps: pick one style, set a plan, and start with a 60-inch piece or a trio of 20s for balance. This simple plan helps you swap in new looks anytime.
5. Vintage Door Headboards
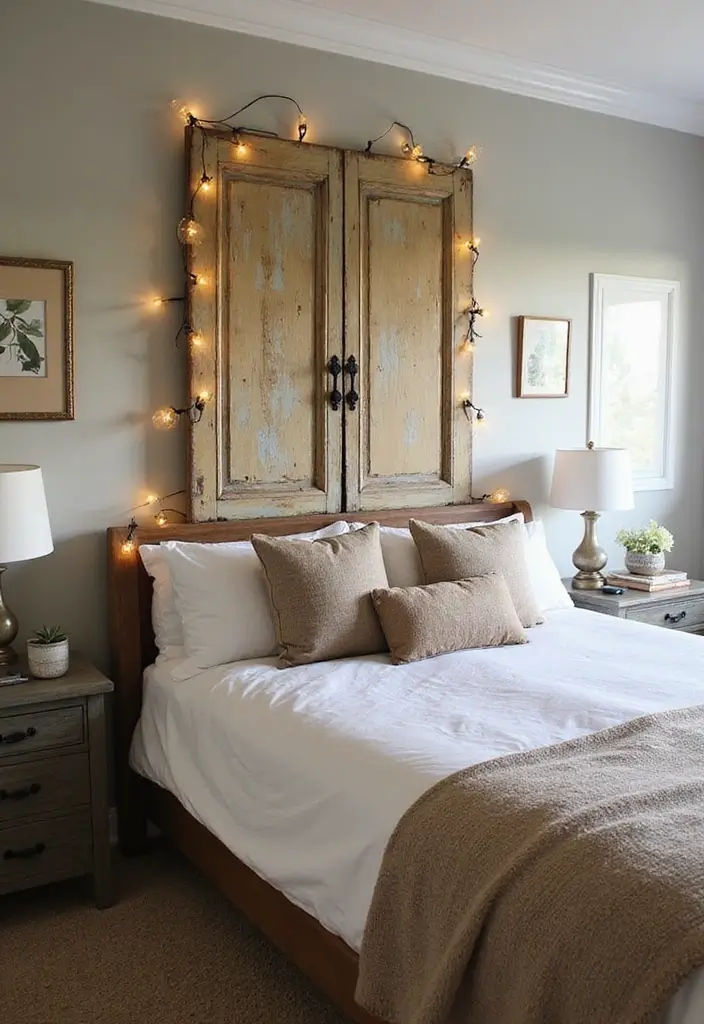
You want a headboard that grabs attention without breaking the bank. A vintage door headboard does this by adding texture and a story to your room. An old door fits many looks, from farmhouse to boho, and it wears age with charm.
Here is why it works. The door brings depth to the wall. It gives you a natural conversation piece. It also lets you mix colors and fabrics easily.
– Pick a door with solid wood and clean lines. Check that it isn’t warped. Match the door width to your bed for a balanced look.
– Prep first. Wipe off dust, fix loose panels, and give the edges a light sand.
– Finish matters. Paint it in a color that fits your room or stain to keep the wood grain visible. Add a clear top coat for protection.
– Add personality. String fairy lights, hang a few small frames, or drape a woven scarf for texture.
– Install safely. Mount brackets into wall studs. Secure the door so it sits steady and won’t tilt.
If you shop at flea markets or thrift stores, you may find a real bargain. Vintage finds often cost less than new pieces and give your bedroom a one‑of‑a‑kind look.
Next steps. Measure your bed and wall space. Choose a door that matches the bed width. Gather supplies and plan your finish to get started this weekend.


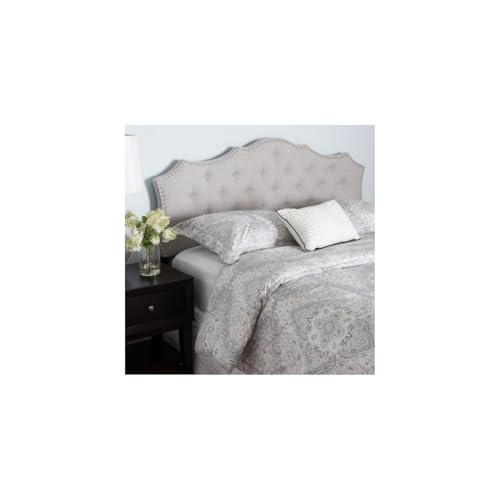
6. Fabric-Covered Headboards

You want a headboard that feels warm and stylish. Fabric-covered headboards bring comfort and character. Choose bold prints or rich textures to show your style. They offer a soft backrest and act as a room’s focal point. Pick colors and textures you love.
This can be a weekend project. Use a simple wooden base, add foam for comfort, and wrap it in fabric. The result is a smooth, inviting surface you can lean on. If you want a quick finish, cover an existing headboard with fabric and skip extra padding.
What you need
– Half-inch plywood or a ready-made wooden headboard
– Foam padding sized to your base
– Batting for a smooth layer
– Upholstery fabric in a pattern or texture you love
– A staple gun and staples
– Glue, scissors, sandpaper
DIY Tip: Pick upholstery fabric for durability and easy cleaning.
Tricks: Mix textures. Pair a soft fabric headboard with linen bedding to add depth.
Unique Insight: You can switch fabrics later to refresh the room without changing the entire setup.
Here is why it works: fabric softens walls, dampens sound, and makes your bed inviting. It also lets you refresh the room with a simple fabric swap. Next steps: measure, cut, and staple. Keep fabric clean by blotting spills with a damp cloth.


7. Gallery Wall of Art
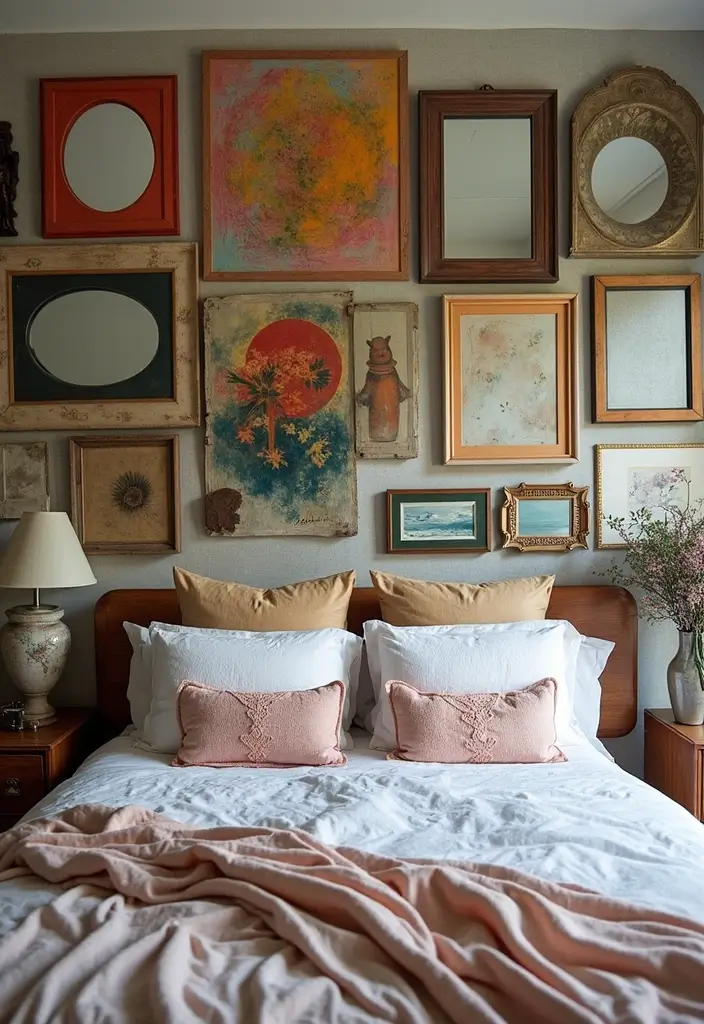
You want a bold headboard wall that feels like you. A gallery wall does that with style and ease. It turns the bed zone into a living art spot.
Here is how to start. Gather pieces you love. Mix framed art, mirrors, and personal photos. Choose items that fit a bohemian mood, bright colors, free shapes, and nature themes.
Let’s break it down into steps.
– Plan the layout Start with the layout. Lay your pieces on the floor. Try different arrangements until you find balance. Take photos of the layouts so you can recreate them on wall.
– Choose a unifying idea Choose a unifying idea. Pick a color trio or a common theme. Use two or three frame styles to keep it interesting but not chaotic.
– Tricks for cohesion Tricks for a cohesive look. Align the bottom with your mattress top. Use painter’s tape to trace the wall layout.
– Keep it flexible Keep it flexible. A gallery wall lets you swap one frame at a time. You can refresh the vibe without a full overhaul.
– Practical touches Practical touches. Add mats for a clean border. Vary frame sizes to create rhythm.
Next steps. Hang the pieces with proper hardware. Step back and adjust until the line feels even. Enjoy a bold backdrop that grows with you.


8. Stenciled Designs
Stenciled Designs
Want a bold wall behind your bed without diving into wallpaper? Stenciling gives you pattern and color you can swap later. A boho stencil with geometric shapes or delicate flowers sits behind your headboard and adds depth. You get a look that fits your style while keeping things easy to adjust. It’s simple, affordable, and you control every color choice.
Here is why this works for you. It adds texture and interest without overwhelming the room. You can pick a few colors that match your sheets and pillows. If you move or change taste, you can repaint just the stencil area. And, yes, you can do it with friends to make it more fun.
How to try stencil designs behind your headboard
1) Pick a stencil style. Go geometric for a clean vibe or floral for softness. Pick patterns that repeat well behind a bed.
2) Gather supplies. You’ll need a stencil, painter’s tape, stencil brush or a sponge, the paint colors you want, a pencil, a level, and a drop cloth.
3) Prep the wall. Wipe it clean and let it dry. Fix any rough spots so the stencil sits flat.
4) Lightly sketch outlines. Use a pale pencil to mark where the stencil will sit.
5) Position and tape. Place the stencil where you want it and tape the edges so it won’t slip.
6) Apply paint. Dab lightly with a sponge or stencil brush. Use tiny taps, not swirls, to keep edges clean.
7) Lift and check. Remove the stencil while the paint is still a bit tacky to avoid smudges.
8) Touch up and seal. Fill small gaps with a tiny brush, then seal with a clear coat if you like extra durability.
Tips and practical notes
– A sponge gives a softer texture than a stiff brush.
– Practice on cardboard first to get your pressure right.
– Align repeating patterns with a level so the design stays straight.
Next steps. Start with a small panel behind the bed to test color and scale. If it works, expand the stencil across the wall for a cohesive, stylish backdrop.


9. Floating Shelves with Decor
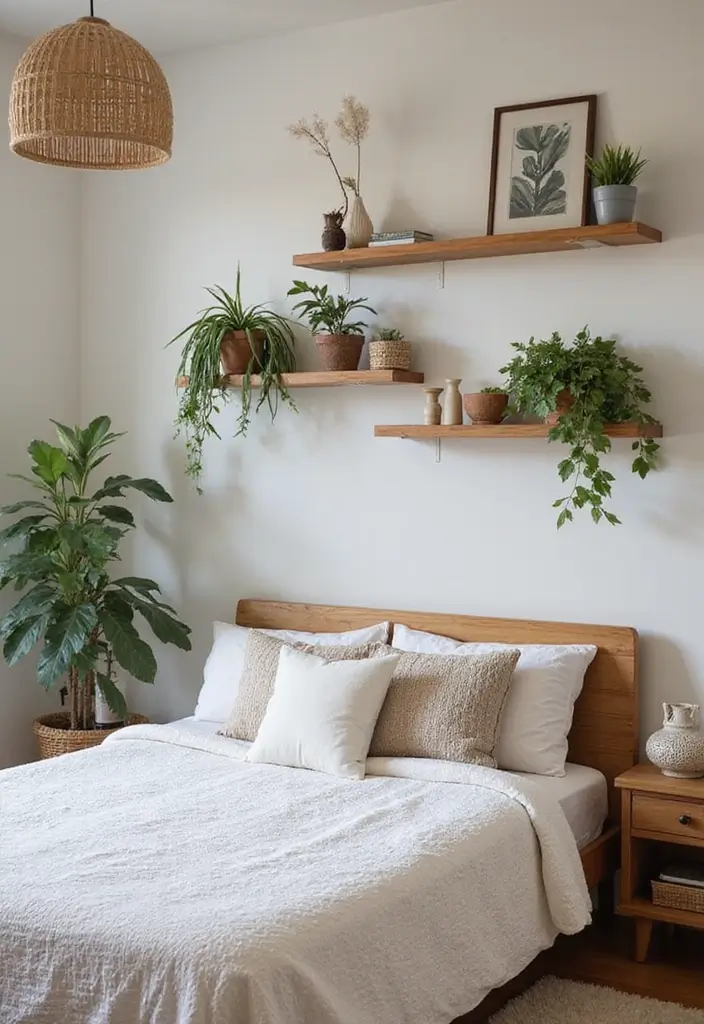
– Effortless upgrade: Floating shelves above your bed add storage, showcase small decor, and bring a clean, finished look without crowding the room.
– Practical spot: You gain a place for plants, art, photos, and little keepsakes that reflect your style.
– Finish choice: Pick shelves with a natural wood finish to boost a boho vibe and warmth.
– Seasonal change: You can swap items with the seasons to keep the vibe fresh and personal.
– Three-item rule: Group items in threes for a calm, balanced display that feels intentional.
– Bring life: A plant or two adds life, color, and a gentle scent to the headboard area.
– Keep it light: Use small items so the display stays airy and easy to reset.
– Space illusion: Shelves draw the eye up and can make the room feel larger.
– Smart placement: Align shelves with the headboard and leave space for pillows.
– Care tips: Natural finishes age well; wipe clean with a damp cloth to keep them fresh.
– Seasonal rhythm: Try warm autumn tones or cool spring greens to refresh the look.
– Weight check: Always check weight limits and use sturdy brackets so nothing slips.
– Plan first: Sketch a quick layout, measure spacing, and mark studs before you mount.
– Start small: Begin with two shelves, test the feel, then add more if you like.


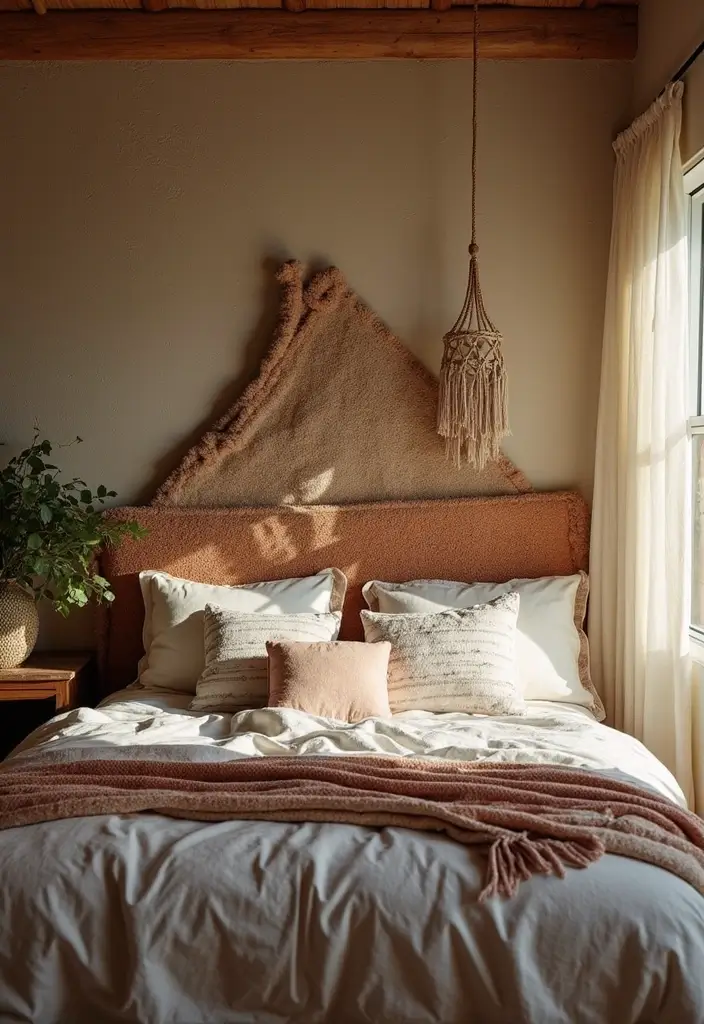
10. Nature-Inspired Headboards
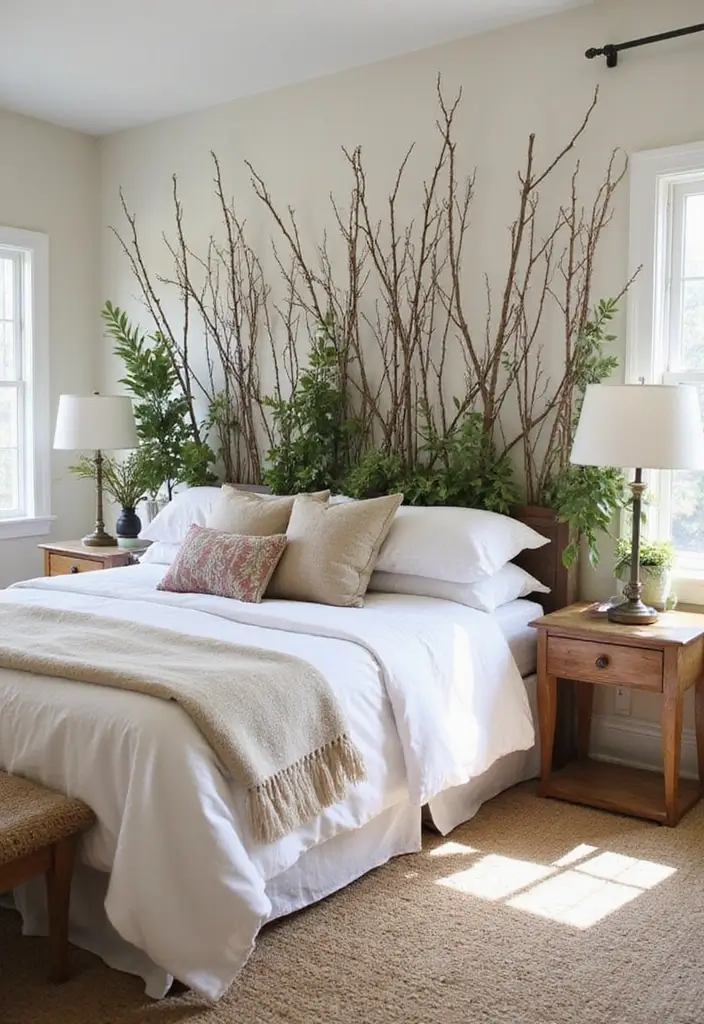
Craving a bed wall that feels bold yet peaceful? A nature-inspired headboard makes this possible with simple pieces you may already have. It brings the outdoors inside and adds texture without a lot of work. You can use real branches, driftwood, large leaves, or garlands of greenery to create a striking focal point.
– Materials to use Real branches, driftwood, big leaves, preserved greenery, or faux plants. Mix textures for depth. Pick natural tones like browns, greens, and creamy whites to keep it calm and cohesive.
– Layout ideas Try a clean grid of straight branches for a modern look. Or let vines and garlands curve softly above the headboard for a bohemian feel. Start with a rough plan on the floor before you mount anything.
– Installation tips Plan the size and shape first. Use a strong wall adhesive to attach pieces. Add discreet supports if you want extra security, like a thin back panel or screws hidden behind the decor.
– Care and refresh Swap greenery every few weeks to keep it fresh. Dust branches gently and trim wilting leaves. This keeps the look current without a lot of effort.
– What you gain A calm, earthy vibe that suits nature lovers and boho styles. It creates a bold wall while still feeling natural and inviting.
Next steps: pick your favorite materials, lay them out, and start to install.


11. Quilted or Patchwork Headboard
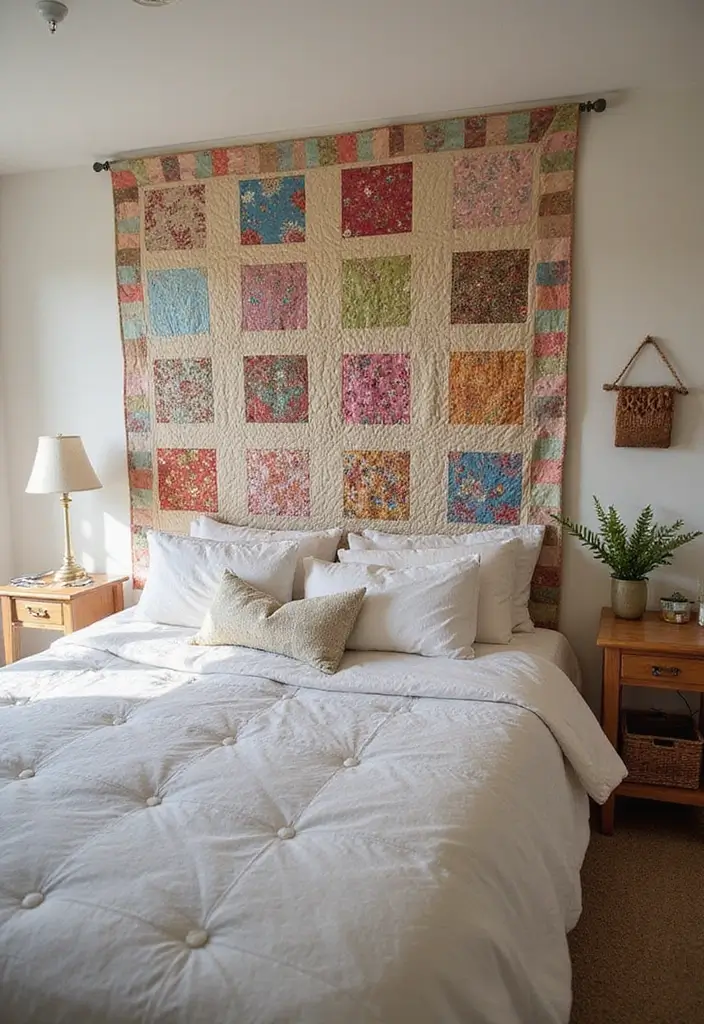
Here is why a quilted or patchwork headboard can transform your space. It adds warmth and texture. You can use fabric scraps you already own, or small pieces that fit your color plan. Mix prints and textures for depth. A simple map of color helps the pieces look tied together.
Next, let’s break it down with practical steps you can follow.
– Materials: A sturdy backing board, fabric scraps or small pieces, batting, thread and needle or a sewing machine, scissors, measuring tape, spray adhesive or fabric glue, and a staples gun or nails.
– Steps: Plan a layout on the floor. Cut patches into squares or strips. Sew patches into a single panel. Add batting and a backing fabric for a soft, sturdy surface. Attach the panel to the backing board with staples or nails. Hang the finished piece on the wall or mount it behind your bed.
– Care: Pick fabrics that wash well. Cotton and linen hold up best. Avoid very delicate fabrics that fade in sun. Check the front and re-secure any loose pieces every few months.
– Styling: Match the colors to your bedding and wood tones. Use a thin border or piping for a crisp edge. Pair it with simple lighting to let the headboard stand out.
Next steps.
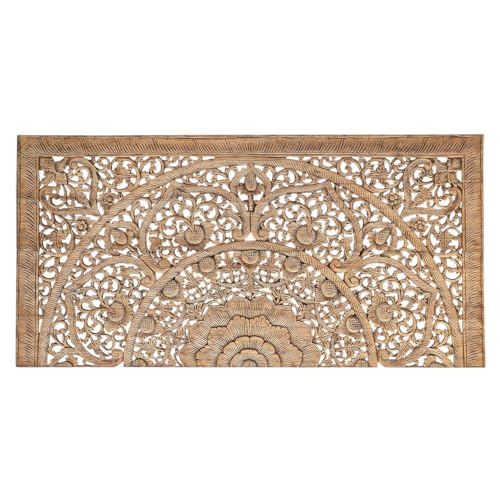
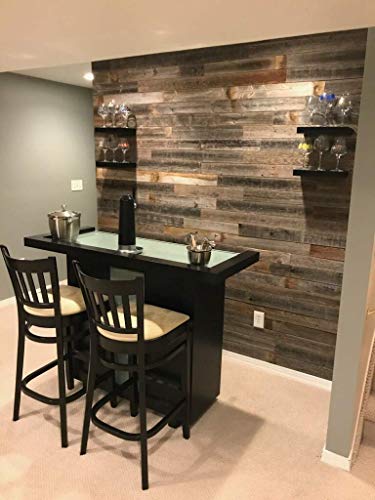
12. Reclaimed Wood Accents
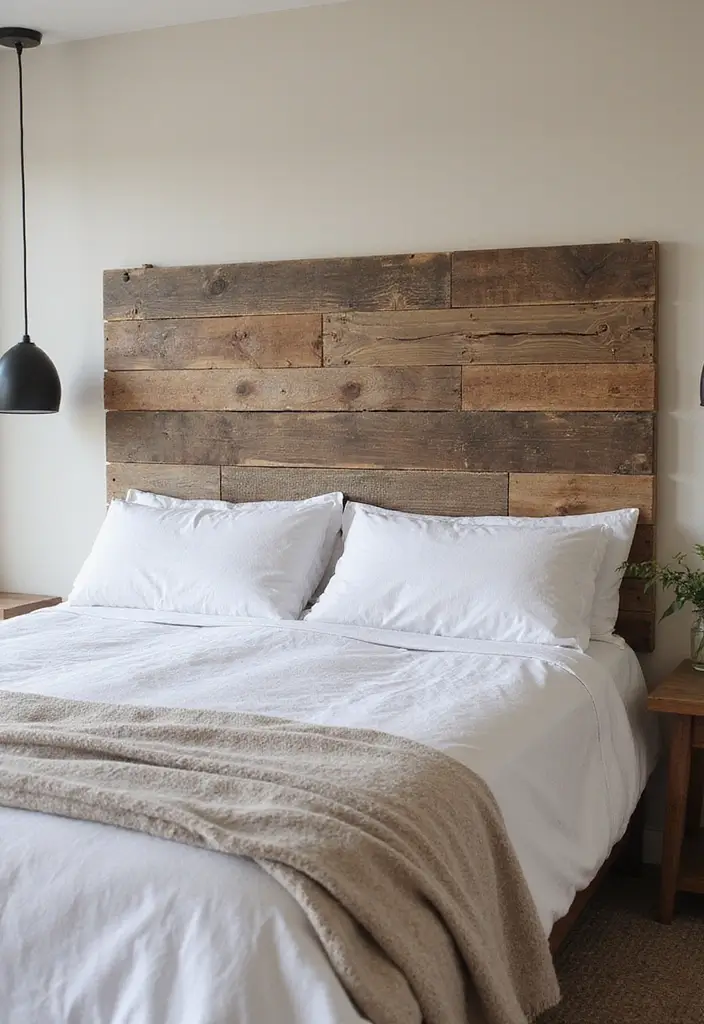
Facing a plain bed wall and tired of the same old look? Reclaimed wood can bring warmth, texture, and a sense of story all in one piece. The boards carry character in every knot and groove. You’ll notice color shifts that shift with the light. This option adds depth without shouting.
How to get the look
– Choose your style: a full headboard made from wide, weathered planks, or a smaller panel set as a backdrop behind a soft, fabric headboard. Both work with many room styles.
– Plan your size: measure your mattress width and decide if you want the wood to extend beyond the frame. Simpler edges feel modern; rough edges feel rustic.
Step by step to install
– Pick planks with sturdy backs and good grain. Light surface checks are fine; avoid wood that looks rotten.
– Cut to size for your bed and wall. Sand just enough to smooth sharp edges while keeping texture.
– Mount with sturdy brackets into wall studs. If you prefer a freestanding option, build a simple frame that rests against the wall.
Finish and care
– Use a clear oil or wax to bring out grain without hiding texture. Skip heavy plastic coatings.
– Wipe dust regularly. Oil or wax every so often to keep the wood lively and easy to touch.
Why it works
– Different grains and colors add visual interest and depth.
– The natural scent and feel of wood make the room feel welcoming.
– It pairs well with boho, rustic, or industrial styles.
Next steps: pick a pair of planks, rough‑planed or smooth, and build your own headboard backdrop today.


13. Neon Sign Accents
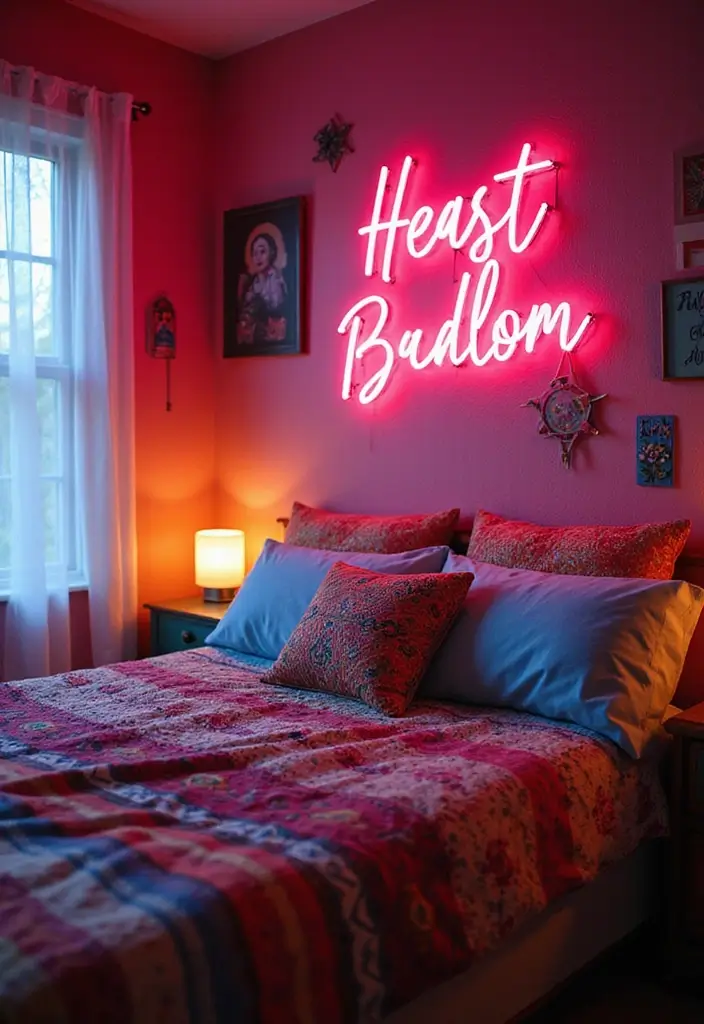
Want a bold glow in your bedroom? A neon sign can be a fun touch that still feels calm. It adds energy to earthy tones and can double as a night light.
– Pick your sign: Choose a quote or symbol that matches your vibe and space. It should feel personal so you smile when you see it.
– Color and glow: Pick warm white or soft hues to keep the room calm. Bright colors can wake the look; use them sparingly.
– Placement matters: Hang it where you can see it from the bed. A soft backdrop helps the glow pop without harsh glare.
– Use it as light: A neon sign can act as a low light at night. Look for dimmable options or low-watt bulbs.
– Balance with textiles: Pair the glow with plush bedding in earthy tones. The warm light will wash the room in comfort.
– Custom signs: A custom neon sign adds a one-of-a-kind touch. It can spell your name or a favorite line.
– Care and safety: Mount on sturdy walls and manage cords neatly. Keep away from moisture and heat sources.
14. Layered Textures
Your bed can look bold and feel warm. Layered textures help you get that result fast. The bohemian style loves fabric mixes. Here is why: texture adds depth, softens edges, and invites your touch.
– Base layer: Place a large textile behind the headboard, like a tapestry, to set tone and color.
– Texture mix: Layer throws, pillows, and a crochet piece in linen, cotton, and knit.
– Wall accents: Add a macrame wall hanging for vertical interest.
– Color plan: Pick two or three colors and repeat them in pillows.
– Texture contrast: Pair rough fabrics with soft ones for depth.
– Space and feel: Layering adds depth and can make a small room look larger.
– Practical balance: Use calm tones and avoid busy patterns so it stays calm.
– Maintenance tip: Dust textiles and gently wash delicate pieces when needed.
– Lighting and mood: Warm, dim lights let textures pop and keep the room cozy.
– Size and layout: For wide beds use a wide panel; small beds use a medium panel.
– Real-life setup: In a gray room, try ivory linen behind the headboard, taupe knit, and cream pillows.
– Practical tips: Position the base layer behind the headboard edge and let pieces fall forward.
– Quick budget fix: Use pieces you own first and swap textiles when needed.
Next steps: Gather what you like, test layouts, and tweak until it feels right.
Layered textures are the heart of a bohemian-inspired bedroom. They invite warmth, depth, and a touch of playfulness – perfect for creating a cozy retreat that beckons you to relax and unwind.
15. Geometric Patterns
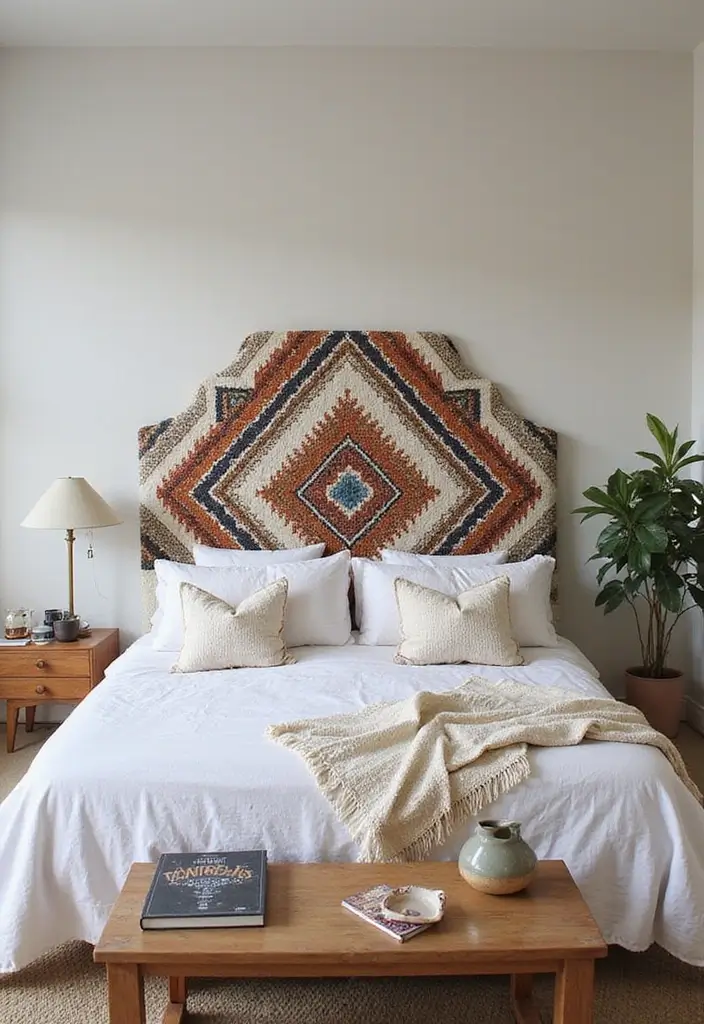
You want a headboard idea that stands out but fits a bohemian room. Geometric patterns give sharp lines that balance the free textures you love. You can bring them in with wall art, or choose a headboard that wears a geometric shape.
Here is why it works: the straight edges guide the eye and calm busy fabrics and patterns. A large painted panel behind the bed reads as a single statement while keeping the space easy to live in.
– DIY Tip: Tape off sections of the wall to keep lines clean when you paint. Score the edges with a utility knife and remove the tape while the paint is still slightly tacky for crisper results.
– Tricks: Use high-contrast colors for a bold impact. Pair black with white, deep blue with cream, or metallic accents with matte neutrals.
– Unique Insight: Geometric patterns create order. They help a boho space feel intentional even when you layer rugs and throws.
– Scaling Idea: Start large behind the bed, then try a smaller repeating pattern along the edge of a headboard for subtle texture.
Next steps: choose a shape you like, then test it on a small wall panel or on a headboard insert. Start with one area and expand if you love the look.

16. Shiplap Wall Panels
Looking to add a bold yet cozy focal point behind your bed? Shiplap panels do this with ease. White-washed boards bring a rustic, airy vibe that fits boho style. You get texture and light in one wall.
Here is how to use shiplap for a bedroom wall:
– Material choices: Pine or poplar boards work well. You can also use prefinished plywood for a budget option.
– Color and finish: Whitewash keeps the wood grain visible and adds a beachy touch. If you want a softer look, gray washes work too.
– Board layout: Install boards horizontally for a classic look. Leave small gaps between boards for a casual, breathable feel.
– DIY timing: Plan a weekend for prep, install, and finish.
Practical tips:
– Prep and install tips: Start with a clean wall. Seal edges to keep dust down. Use nails or glue along seams. A bubble level keeps rows straight.
– Let the decor talk: White shiplap supports bright textiles and bold pillows.
– Maintenance: Wipe with a damp cloth. Touch up whitewash if the grain fades.
Benefits: Simple lines of shiplap form a calm backdrop that makes bold art and textiles pop. It fits farmhouse and boho blends and takes the room to a cozier feel.
17. Statement Mirrors
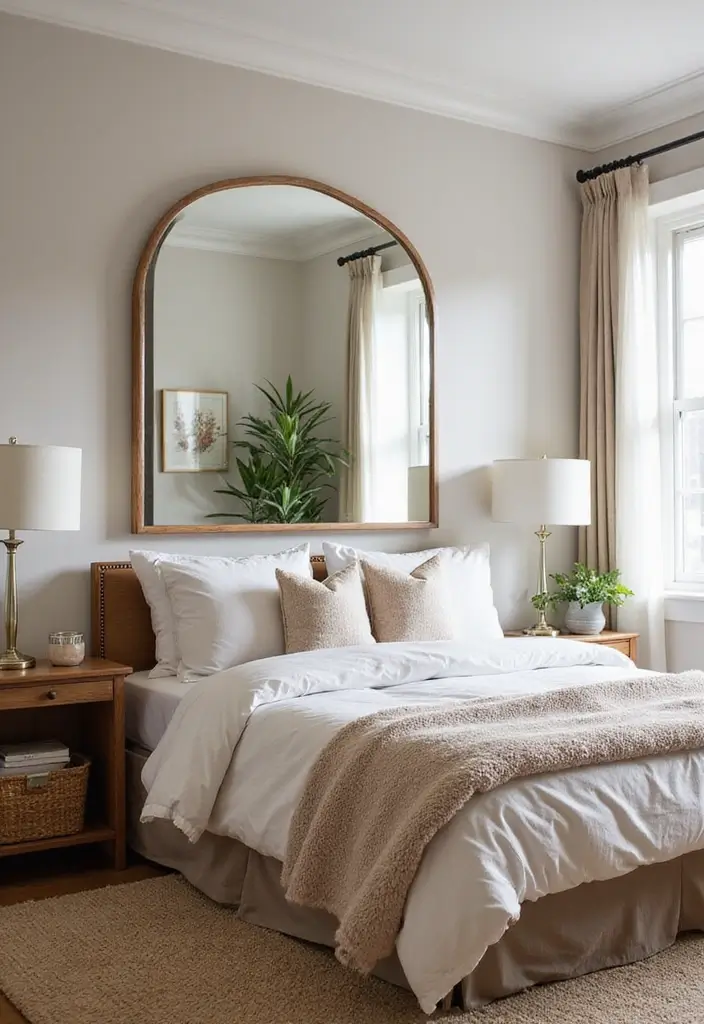
Here is why a big statement mirror makes a bold bed wall. You get a strong focal point that feels both stylish and calm. The right mirror reflects light and adds depth, making the room feel bigger.
Choosing the look Start with shape before frame. A mirror with an ornate frame, a sunburst design, or a soft oval can draw the eye. You can mix wood, metal, or carved details to fit your bed and nightstands. Pick a size that covers the wall above the headboard without overwhelming it. If your ceiling is high, go larger. If space is cozy, a smaller piece fits.
Placement and balance Center the mirror over the bed so it feels like a single art piece, not a shelf of reflections. Pair it with wall sconces or a pair of plants on each side. Sconces bounce light off the glass for a warm glow.
Practical tips – Look for vintage or antique mirrors for unique finds. – Position it to reflect natural light from a window. – Hang securely with wire or cleats.
Why it helps Mirrors lift mood by brightening the space. They’re easy to swap out if you want a fresh look later.
18. Recycled Materials Creations
You want a headboard that feels bold, personal, and planet-friendly. Recycled materials can give you exactly that. You can turn old frames, bottles, wood scraps, and metal bits into a piece that tells your story. This approach cuts waste and gives you a one-of-a-kind design you can enjoy every night. Pick colors that fit your room and pull the pieces together.
Here is why this works.
– DIY tip: Start with thrift stores and flea markets. Look for frames, bottles, and wood scraps. Gather items that feel like your style.
– Tricks: Mix textures by pairing wood, metal, and glass. Create a loose grid on a plywood backer to guide placement. Secure items with brackets, wire, or hot glue so they stay put.
– Unique insight: A headboard made from recycled pieces often becomes a conversation starter. Guests notice the colors, shapes, and why you chose them.
Next steps: Measure bed width and wall space. Sketch a plan or lay items on the floor to see balance. Mount with a simple backer board and small brackets. Finish by painting the backer or leaving raw for a rustic look.
19. Wall-Mounted Plants
You want a bold headboard wall. Greenery is a quick way to get it. Wall-mounted plants add color, texture, and life without crowding the room.
Here is why it works. Plants brighten the space and feel fresh. They also help purify the air and calm the mind after a long day. In a bedroom, that calm matters.
Let’s break it down. You can use floating planters or pots that hang right above your headboard. The goal is a soft cascade that draws the eye upward and creates a lush backdrop.
Plant picks that work well. Trailing varieties shine here. Try pothos for long vines and a spider plant for graceful arches. Both are forgiving and easy to care for.
– Suggestion: Use lightweight planters to make installation easy.
– Tricks: Place plants where they get bright indirect light; rotate every few weeks for balanced growth.
– Practical tip: Mount with sturdy hooks or a slim rail; keep drainage and waterproofing in mind.
Next, a quick care note. Check your wall for moisture and choose planters with drainage. If light is dim, add a small LED lamp to keep growth steady.
Next steps: plan your layout, gather planters, and mount them. Enjoy a green, eye-catching headboard wall every night.
Add a touch of green to your bedroom headboard wall ideas! Wall-mounted plants not only beautify your space but also invite calmness and fresh air into your sanctuary.


20. Paint a Mural
Paint a mural behind your bed to make the wall a statement piece. Here is why it works: a mural adds color, texture, and a personal touch that you see every night.
– Theme: Choose a theme that speaks to you, like florals, landscapes, or abstract shapes. Pick colors that match your room and mood.
– Plan the wall: Find the center and think how the mural sits with the bed and furniture.
– Prep the wall: Clean, patch, and prime for a smooth surface.
– Transfer your design: Sketch on paper first, then map it on the wall with a light grid or projector.
– Layers of paint: Start with a soft background, add mid tones, and finish with details. Work big first.
– Edges control: Use painter’s tape for crisp lines. Press tape down with a card to seal edges.
– Tools and paints: Acrylics dry fast and clean easily. Use a large brush for big areas, small ones for tiny lines.
– Finish and care: Seal with a matte top coat for protection. Ventilate well while you work.
– Next steps: Step back often to check balance. If a part looks off, touch it up before it dries.
– Reality check: A mural may take time, but it makes your wall feel like you.
Real-world tips: If you are new to art, start with a small section to build confidence. You can repaint later.
Take your time. A mural grows with you.


21. Velvet Headboards
Here is what velvet can do for your space. You want a bed wall that feels rich but not loud.
– What velvet adds Velvet headboards bring warmth and a soft, inviting glow that makes your bohemian room feel calmer and more luxurious with every glance.
– Color choices Choose jewel tones like emerald or sapphire for drama, or soft neutrals like sand or sage for a calm, cozy vibe that works with any wall color.
– Texture and light The plush nap of velvet catches light in a soft, shifting way, adding depth to your walls and making the bed wall feel closer and warmer.
– Style options Go with button tufting for a classic touch, or pick a flat, smooth panel for clean lines that still give your room a tactile feel.
– Pairing ideas Balance a bold headboard by mixing it with light linens, natural wood furniture, and warm brass accents to keep your space airy, not overpowering.
– Care tips Keep it looking rich by vacuuming weekly and blotting spills right away with a gentle cleaner to protect the velvet nap.
– Next steps Decide your color, choose tufted or flat, and add throws and pillows to finish the look.
When you style it right, velvet stays nice for years and adds a soft glow to daily life.
22. Layered Wall Hangings
You want a headboard that feels warm and stylish without buying new furniture. Layered wall hangings give a soft headboard effect with a boho vibe. Here is why it works: texture, color, and depth make the bed feel cozy. You can swap pieces with the seasons to keep it fresh. Layering adds warmth and a gentle focal point you can tailor.
Let’s break it down.
Materials to mix
– Woven baskets of different sizes
– Fabric banners or quilts
– Macrame wall hangings
– Tapestry or textile panels
– Lightweight wood slats or bead strands
Why this adds depth
Layering creates texture and soft edges around the bed. It makes the headboard feel more inviting and personal.
Setup and layout
– Measure the width of your bed and choose 4 to 6 pieces.
– Lay them on the floor to test balance and spacing.
– Install a horizontal rod or two sturdy wall hooks for easy changes.
– Place a large anchor piece in the center, then distribute smaller pieces around it and leave space between them.
Tips to keep it fresh
– Rotate pieces every few months.
– Vary textures and natural tones.
– Keep one calm anchor to avoid a busy feel.
Next steps
Gather your pieces, test the layout on the floor, then hang. If you want easy swaps, use a curtain rod or adjustable hanging system.


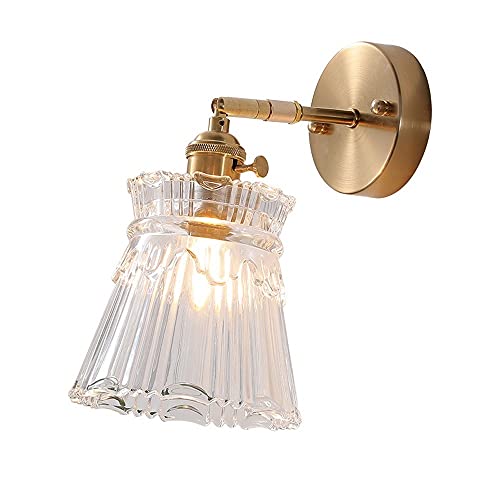
23. Chandelier or Pendant Lights
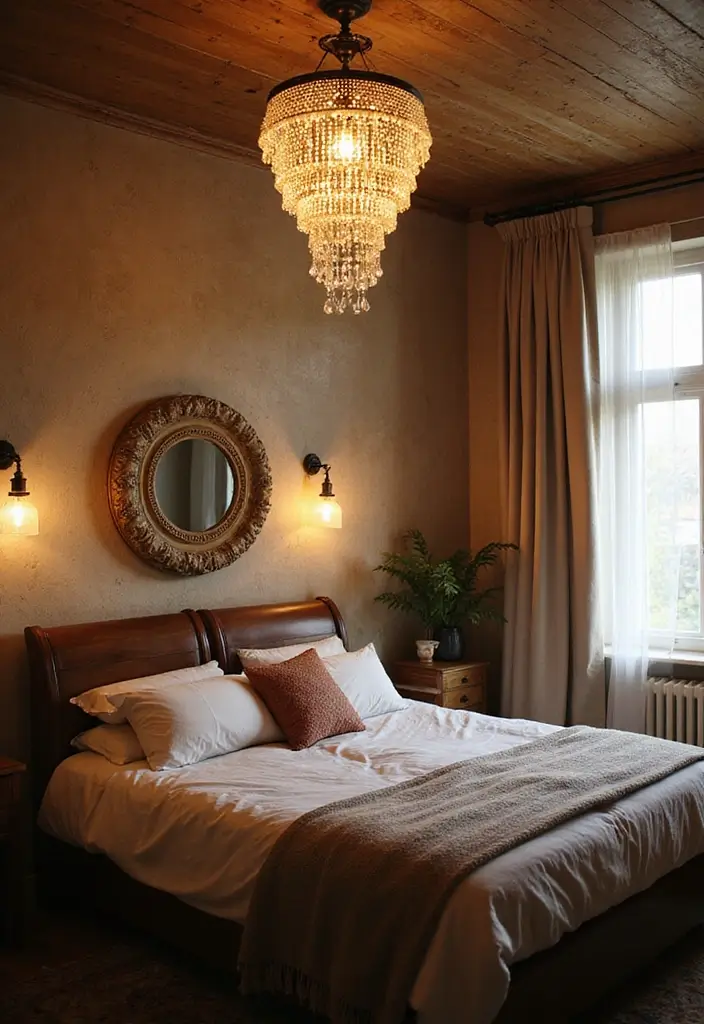
Your headboard wall can feel flat. You want a glow that adds mood and invites the room. A chandelier or pendant light above the bed does both. It gives shape and warmth for reading or winding down.
Bohemian style and fixture ideas
Choose pieces that fit your bohemian look. Think wrought iron with soft curves, colorful glass beads, or warm wood. Textured finishes keep the look rich and easy to mix with other decor.
Placement and scale
Place the fixture centered over the headboard. Let the shade bottom be about 24 to 36 inches above the mattress. If the ceiling is tall, drop it a bit more. If it is low, choose a compact pendant. A dimmer controls mood and task light.
Impact and display
Next steps for impact. Go large for drama or add three smaller pendants for a gallery feel. Oversized fixtures grab attention and become a focal point. Let glass or metal tones echo other colors to create harmony.
Practical lighting tips
Practical tips. Use warm bulbs around 2700 to 3000 Kelvin for a soft glow. If you can, pick adjustable fixtures so you can change light levels. For safety, mount correctly and check weight limits.
Final thoughts
This approach blends style with function. It lifts the headboard wall and makes bedtime routines feel cozy without taking over the room.
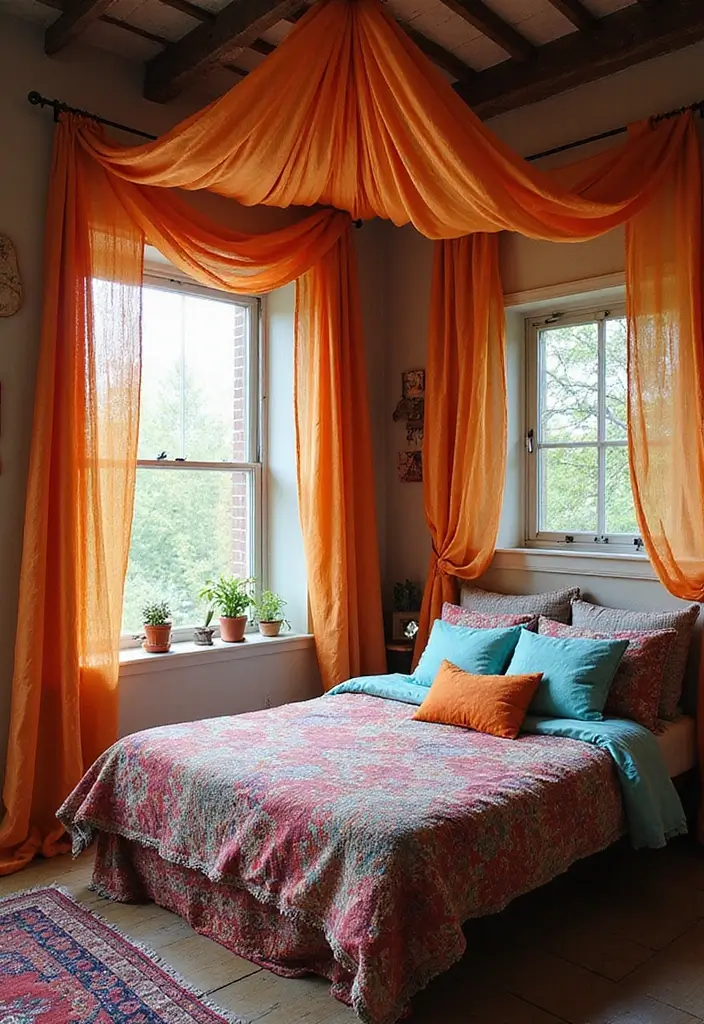
24. Floating Canopy
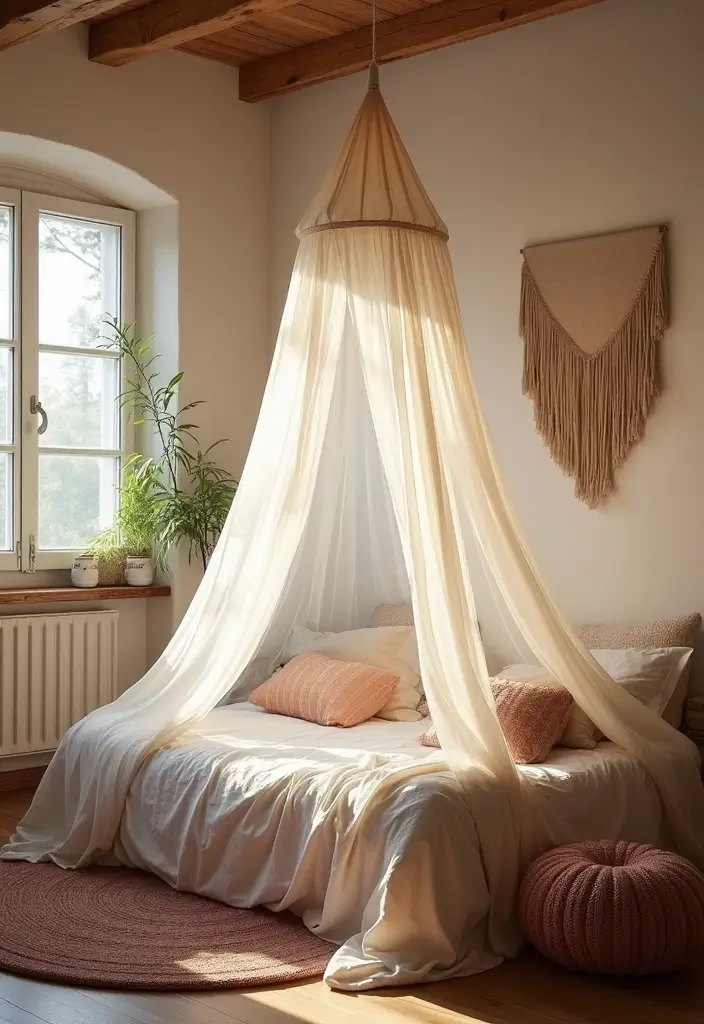
You want a look that feels dreamy but simple. A floating canopy adds that feel with light, sheer fabric. It hangs above your bed and drapes softly to frame your space. This setup creates a private nook you can retreat to after a long day.
Here is why it works. The fabric softens edges and light. It muffles stray noises and makes the room feel calmer.
– DIY Tip: Use ceiling hooks to suspend the fabric securely.
– Tricks: Pick lightweight fabrics like voile or chiffon for an airy look.
– Unique Insight: A canopy filters light, giving a soft glow that stays gentle even at night.
Materials and color guide. Choose sheers like voile, chiffon, or cotton voile. White or cream keeps the room bright, while soft beige or gray adds warmth. Shorter panels give a crisp look, longer drapes feel more enveloping. Measure from the ceiling to bed height to decide length.
Next steps. Plan where the canopy will start above the headboard. Use ceiling hooks and a lightweight rod if you want a neater edge. Hang the fabric so it just grazes the bed or ends a few inches above the floor. Clean by hand wash or gentle cycle, air dry.
25. Customizable Chalkboard Walls

Want a headboard that feels playful but stays useful? A customizable chalkboard wall behind the bed can do that. It blends fun with function and fits many styles.
Here is why this idea works. You get a space for doodles, quotes, or a weekly plan. Change the look as often as you like without buying new decor. It’s easy to change the layout later when you want a fresh feel.
What you need
– Chalkboard paint in a matte finish
– A smooth wall section behind the bed
– Painter’s tape, a level, and sandpaper
– A small foam roller and a brush
– Optional: magnetic chalkboard paint or a clear matte sealer
Steps to create a chalkboard wall headboard
1) Prep the wall. Clean the surface, dry it, and lightly sand the area. Tape off the edges to keep lines sharp.
2) Prime and paint. If the wall is glossy, prime first. Apply two even coats of chalkboard paint and let each coat dry.
3) Cure and test. Let the surface dry for 24 to 48 hours before you write on it.
4) Finish. If you want more durability, seal with a clear matte spray once it is fully dry.
Tips for best results
– Use bright chalk colors for a lively look.
– Keep a damp cloth handy to wipe away mistakes.
– Use the wall as a daily message board for notes, quotes, or a meal plan.
Next steps: place the bed, try a few doodles, and enjoy a space that writes back.
26. Color-Blocked Walls
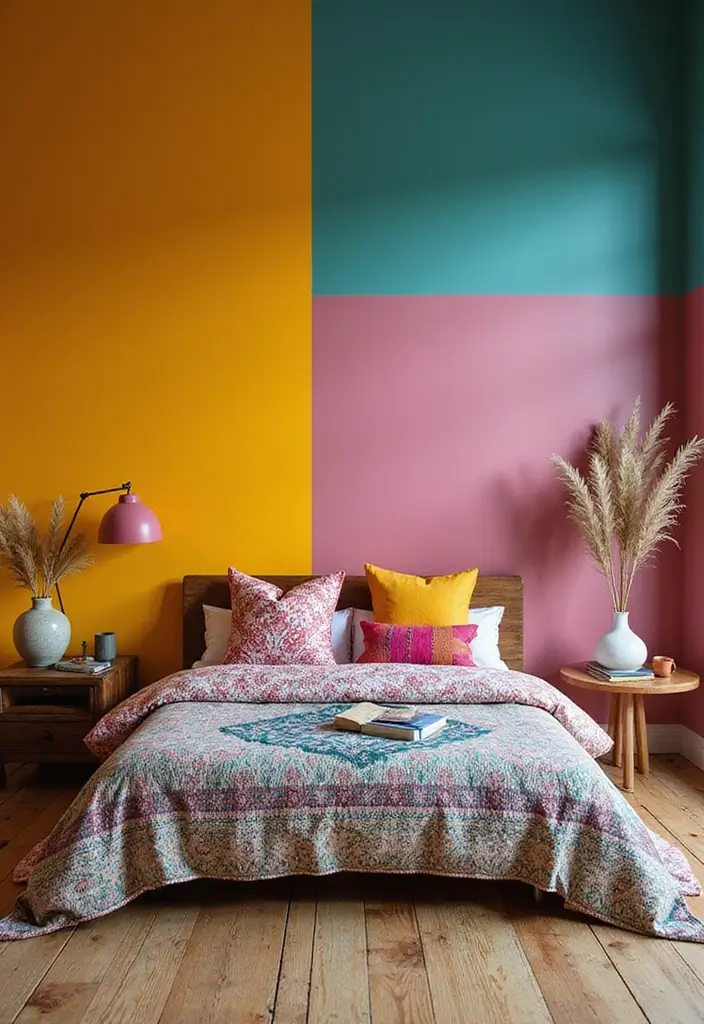
Color blocking is a simple way to give your bedroom a fresh look. You lay blocks of color on the wall behind your bed. Those blocks act as a bold backdrop that works with your bedding and accents.
This method helps the eye focus on the bed. The right sizes and contrasts can make the ceiling look higher or the walls feel wider. It gives your room a polished look without buying new furniture.
– Palette plan: Pick 2-3 colors from your sheets, pillows, or wall art.
– Layout ideas: Try a wide horizontal band across the top or a large central panel behind the headboard.
– Sharp edges: Press the painter’s tape down to seal edges before you paint.
– Paint tips: Use even coats, let each layer dry, then pull tape away for clean lines.
– Finish and care: Pick a matte or soft gloss that matches your bed frame.
Next steps: lay out the tape on the wall to preview the lines before you paint. Test your color combo in daylight and in lamp light. Start with a small block to see how the room feels today.


27. Dried Flower Arrangements
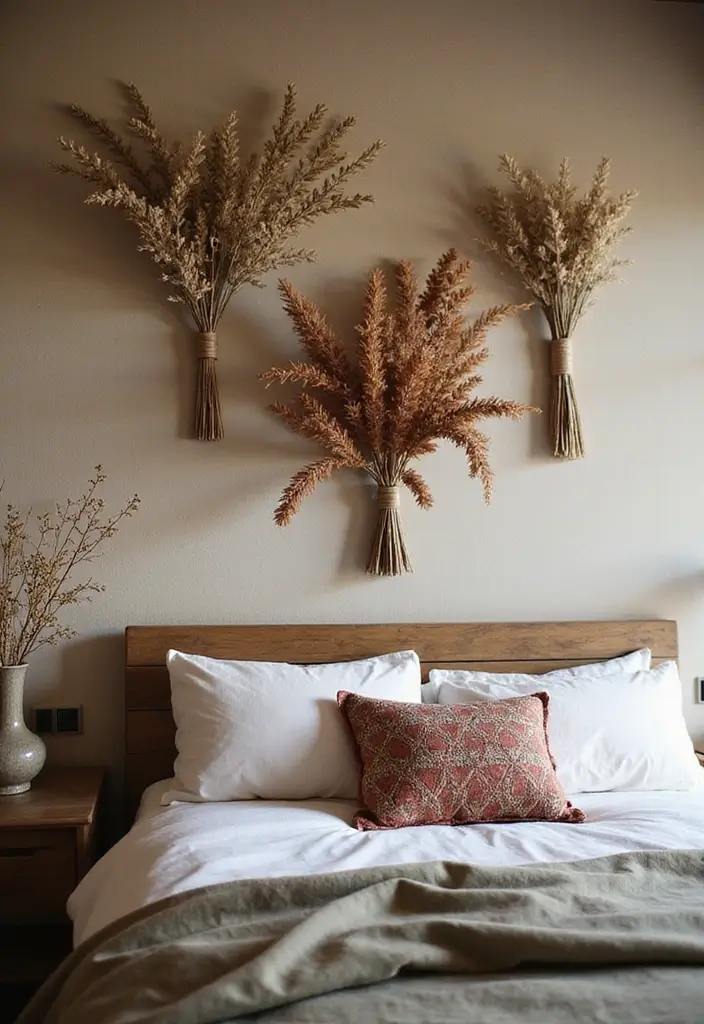
You want a bold headboard wall that feels alive without a lot of work. Dried flower arrangements give an organic, boho look that lasts. This section shows you easy ways to arrange them above your bed.
Display ideas
– Hang a natural garland by using twine or thin wire to form a soft curve across the wall above your headboard.
– Build a wall panel. Clip stems to a lightweight board or frame for a compact, artful piece.
– Create a small bouquet on a shelf or ventilated ledge just over the bed. Group three to five arrangements for visual weight.
Flower selection and styling
– Pick a mix of colors and textures. Think lavender, statice, eucalyptus, and dried grasses.
– Vary the heights. A tall stem pairs with shorter stems to keep the arrangement interesting.
– Leave space. A little breathing room makes each stem stand out.
Hanging and upkeep tips
– Use sturdy twine or clear wire to avoid wobble.
– Trim stems at an angle. This helps them drink air, not water, and last longer.
– Dust lightly with a soft brush. Keep the sun’s glare away to avoid fading.
Why this works
– Dried arrangements bring texture without daily care.
– They stay pretty for months with little effort, and they fit many bedroom styles.
Give it a try today.
28. Stone or Brick Feature Walls
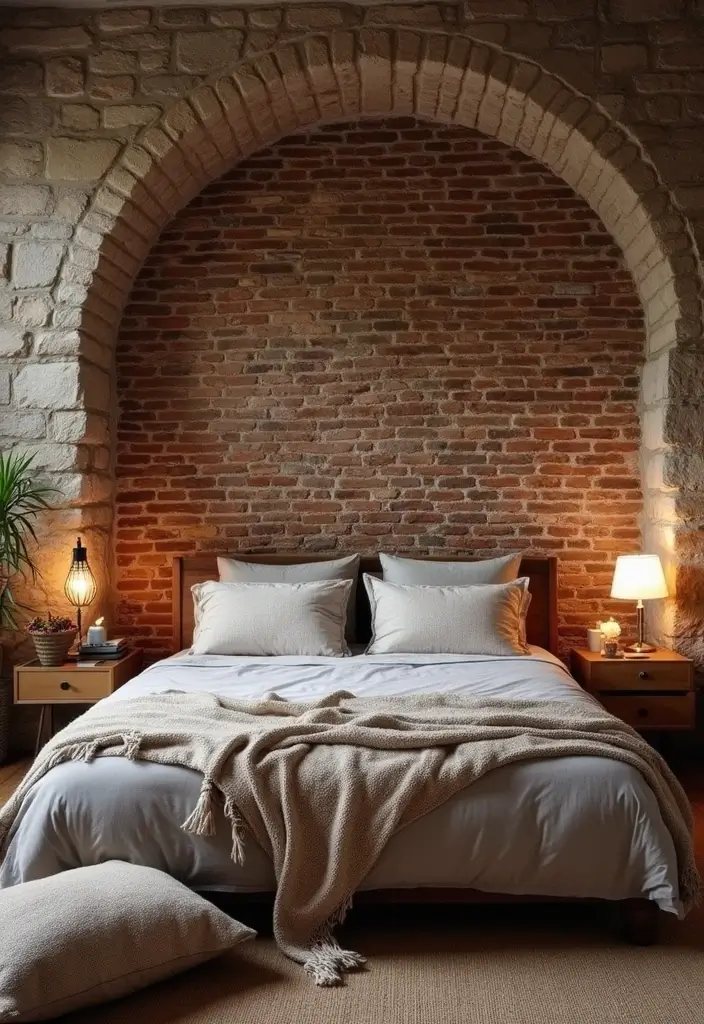
Want a bold focal point behind your bed? A stone or brick wall can do that. It adds texture, depth, and a touch of drama that soft fabrics alone can’t match.
– What to pick
– Real stone: For a rugged, natural look that lasts.
– Brick or brick veneer: Clean lines with warm, timeless feel.
– Faux stone panels: A quick, budget-friendly option that’s easy to install.
– How to pull it off
– Choose a finish that fits your room. Lighter stones feel airy; dark bricks feel intimate.
– Prep the wall. Clean the surface, fill gaps, and let it dry.
– Install. Follow the kit directions for faux panels. If you use real stone, you may want a pro for mortar work.
– Pair with bedding. Pick colors that glow against the texture—cream and taupe with a pop of color, or charcoal with white.
– Light it right. Add warm sconces or a soft recessed light to highlight the texture.
– Quick tips
– Keep the rest of the room quiet in color to let the wall stand out.
– Dust regularly and wipe with a damp cloth to keep the texture looking fresh.
– Seal real stone or brick if needed to prevent stains.
– Care and upkeep
– If you choose real stone or brick, check for chips or loose pieces and fix them soon.
– Clean with a gentle approach; avoid harsh cleaners that touch the texture.
Ready for the look? It can be bold yet balanced, strong yet cozy when you match it with the right textiles and light.
29. Ladder Headboard
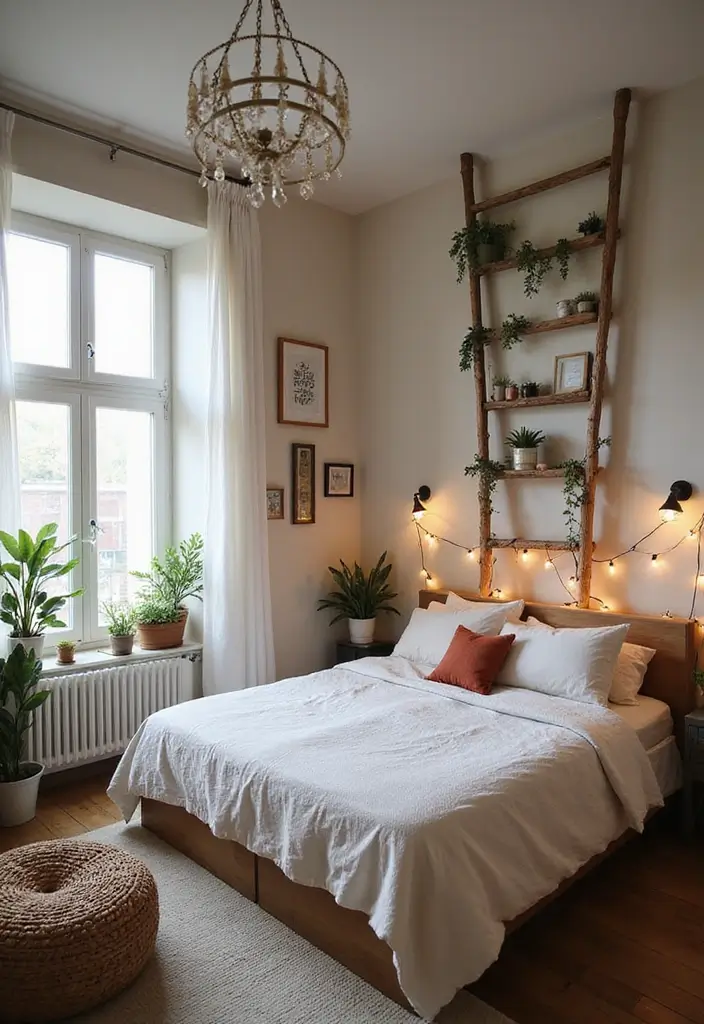
If you want a bold, cozy bed wall, a ladder headboard can deliver. It brings a bohemian feel and keeps decor flexible. You can swap pieces as your taste changes.
– What it is A ladder headboard uses a leaning ladder behind your bed. The rungs give a vertical pull for your eye.
– Why it works It grows with you. You can add lights, fabric, or small plants anytime.
– Choosing the ladder Pick a sturdy ladder in wood or metal. It should fit your bed width and sit comfortably from the wall. Wider rungs provide more space for decor.
– Styling ideas Run fairy lights along the rungs for soft glow. Drape a blanket or tapestry over the top. Clip tiny planters to the sides. Use small baskets for keepsakes.
– Safety and setup Mount the ladder securely to the wall with brackets. If you cannot mount it, lean it with anti-slip pads and check often. Make sure it does not wobble.
– Tips to keep it balanced Use even levels for decor. Leave space for pillows. Rotate items seasonally to stay fresh.
– Realistic notes This is decor, not heavy storage. Keep items light and easy to switch.
Next steps: If this fits your room, measure your space and pick a ladder you love.


30. Funky Fabric Swag
If you want a bold, cozy look above your bed, fabric swag fits the bill. It adds color, texture, and a soft glow without heavy carpentry. You’ll feel the warm touch of fabric as you enter the room, and your bed becomes a focal point in minutes.
Here is why fabric drapes work so well. Pick textiles that hang nicely and match your style. Linen feels relaxed. Velvet adds depth. Cotton is easy to care for. Choose one base color and bring in a couple of complementary shades. The result is a calm, layered look that fits many rooms. This fabric headboard idea uses draped textiles to shape a boho chic or modern vibe.
Let’s break it down how to set it up. Mount a slim curtain rod or a light wooden dowel just above the mattress. Drape fabric panels in soft, loose folds. Let the ends spill over the sides so the fabric frames the headboard like a gentle halo.
Next steps
– DIY Tip: Use curtain rods for easy draping of fabric.
– Tricks: Layer fabrics with different textures and weights to add depth.
– Unique Insight: The soft drapery hides rough wall lines and invites relaxation.
If you want to update later, swap in lighter fabrics for summer, or switch to new colors for a fresh feel. It stays simple and soft year after year.
Transform your bedroom with a fabric swag headboard – it’s the perfect blend of style and comfort! Choose textiles that reflect your personality, and watch your space bloom with color and texture.
Conclusion

Transforming your bedroom with these bohemian-inspired headboard wall ideas can definitely make a bold statement.
From macrame magic to colorful murals, there’s an idea here to suit every style and preference.
Embrace the creativity that comes with bohemian decor, and don’t hesitate to personalize your space in ways that reflect who you are.
Frequently Asked Questions
What Are Some Budget-Friendly Bedroom Headboard Wall Ideas?
If you’re looking for affordable yet stylish options, consider a wooden pallet headboard or a colorful tapestry. These ideas add warmth and personality without breaking the bank. Macrame headboards are also a fantastic choice, offering a trendy boho vibe that enhances your bedroom’s aesthetic without major renovations.
How Can I Incorporate DIY Projects into My Bedroom Headboard Design?
DIY projects can be a fun way to express your creativity! Try creating a gallery wall of art with pieces that resonate with you. You can also experiment with stenciled designs or even paint a mural behind your bed to make a statement. These projects allow you to personalize your space while saving money.
What Are the Best Materials for a Bohemian-Inspired Headboard?
For a bohemian-inspired headboard, consider materials like macrame, reclaimed wood, or even vintage doors. These elements add texture and character, creating a warm and inviting atmosphere. Fabrics like velvet or patchwork can also contribute to that cozy boho feel, making your bedroom both stylish and comfortable.
How Do I Choose the Right Color for My Headboard Wall?
Choosing the right color for your headboard wall can dramatically change the mood of your bedroom. Opt for bold colors or patterns that reflect your personality and complement your bedding. Color-blocked walls or vibrant stenciled designs can create a stunning focal point. Always consider how the color interacts with natural light to achieve the desired effect.
Can I Use Plants as Part of My Bedroom Headboard Design?
Absolutely! Incorporating wall-mounted plants can add life and vibrancy to your headboard wall. They not only enhance the bohemian aesthetic but also improve air quality and create a calming atmosphere. Succulents or trailing vines can be particularly effective for adding a touch of nature to your stylish bedroom makeover.
Related Topics
home decor
bohemian style
headboard design
DIY projects
accent wall inspiration
textured walls
budget friendly
modern bedroom decor
quick makeovers
sustainable design
colorful accents
vintage decor